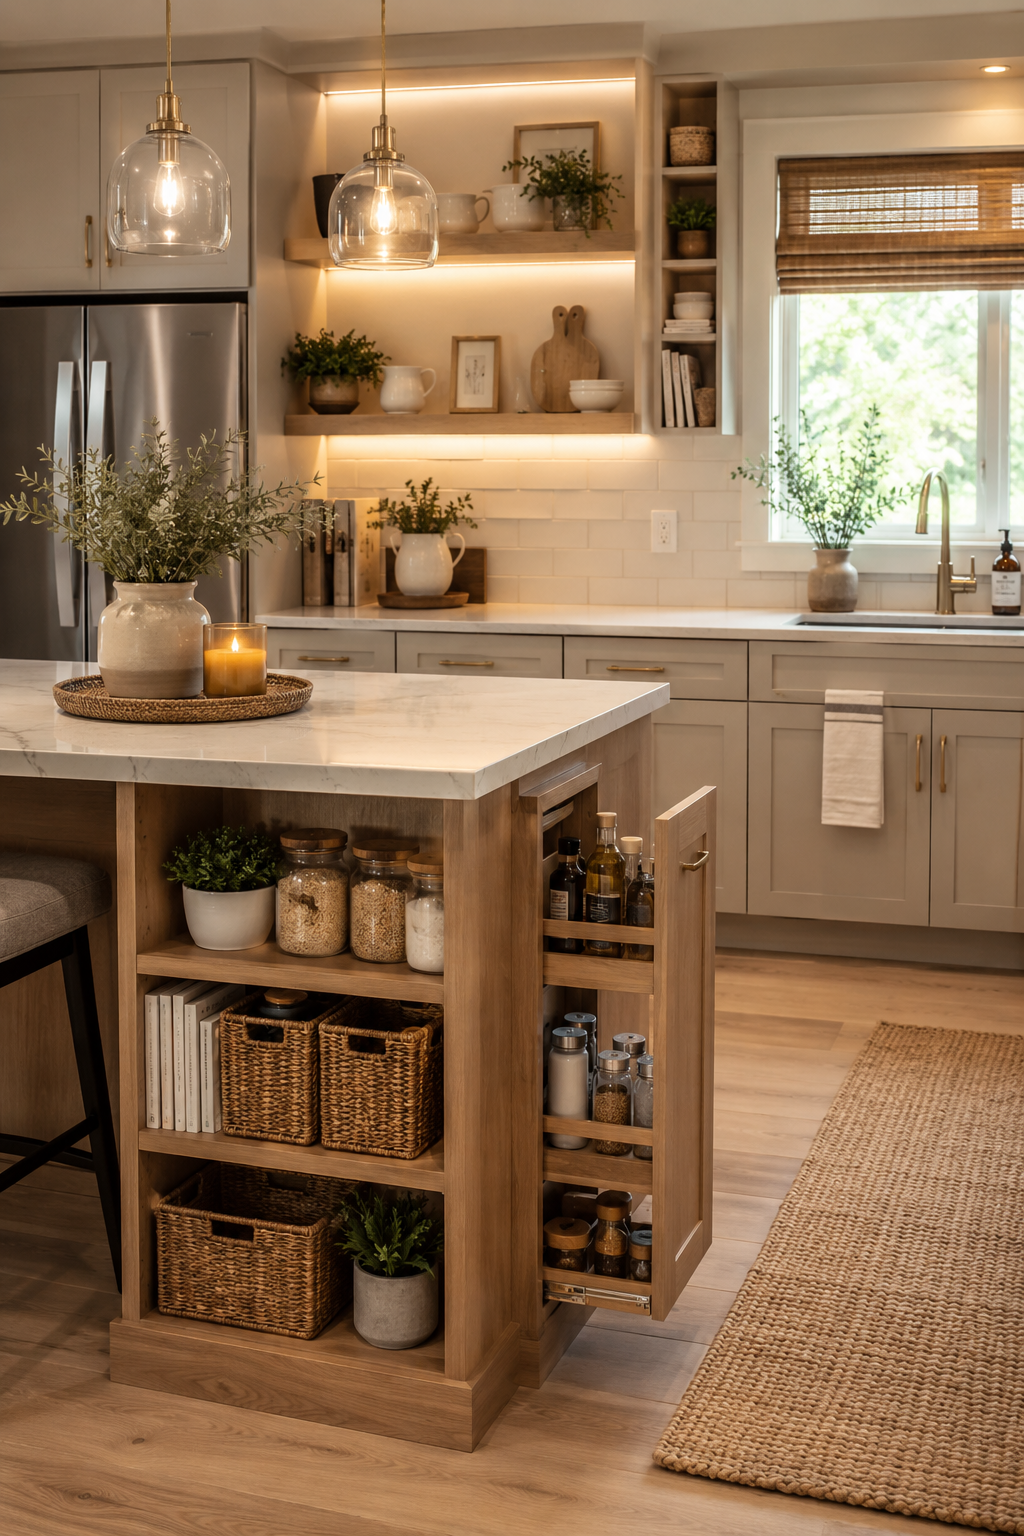
A modern kitchen does not need to be large, expensive, or filled with custom cabinetry to look beautiful and function efficiently. In fact, one of the most inspiring ways to create a stylish kitchen is to work creatively with limited space. Small kitchens often encourage smarter decorating choices because every cabinet, shelf, drawer, wall, and countertop has to serve a purpose. The best modern kitchen decor combines clean visual lines, practical organization, warm materials, and carefully chosen storage solutions so the room feels open rather than crowded.

When storage is limited, the goal is not simply to find more places to put things away; it is to create a kitchen where everything has a logical home and where useful items remain easy to reach. This approach can completely change the way a compact kitchen looks and feels. Instead of allowing countertops to become crowded with appliances, containers, utensils, and everyday necessities, you can use vertical space, unused corners, cabinet doors, narrow gaps, drawers, and attractive open shelving to increase storage without sacrificing style. Modern design works particularly well for small kitchens because it favors simplicity, multifunctional furniture, streamlined hardware, neutral colors, and intentional decoration. A few well-selected materials such as light wood, white cabinetry, matte black accents, brushed metal, glass, or natural stone can create an expensive-looking appearance without requiring a complete renovation. The key is to decorate according to the actual needs of the kitchen rather than copying a large kitchen design that may not work in a compact room. Storage baskets can make open shelves look organized, drawer dividers can prevent small utensils from becoming messy, and magnetic organizers can turn an otherwise unused wall into a functional storage zone. Even the area underneath a sink can become surprisingly useful when cleaning products, brushes, and extra supplies are arranged in stackable bins or pull-out organizers. Another important principle is visual balance. Small kitchens can quickly feel overwhelmed when every available surface is decorated, so modern decor should focus on a few beautiful elements rather than dozens of accessories. A decorative cutting board, a small herb garden, a sculptural pendant light, a simple runner, or a carefully arranged shelf can provide personality while keeping the space visually calm.
Color also has a major impact. Soft whites, warm creams, pale gray, muted green, natural beige, and light wood tones can make a compact kitchen feel brighter and more spacious, while darker accents can add contrast without dominating the room. The following ideas are designed specifically around this combination of modern aesthetics and small-space functionality. Each concept can be adapted to apartments, rental kitchens, narrow kitchens, studio spaces, older homes, or compact family kitchens. You do not need to implement every idea at once. Start by identifying the areas that create the most clutter, then choose storage solutions that address those specific problems. Think of the kitchen as a collection of small zones: food preparation, cooking, cleaning, coffee or beverage preparation, pantry storage, and everyday serving. When each zone has appropriate storage, the entire room becomes easier to maintain. These ideas also prioritize beginner-friendly improvements that can be completed gradually, often without major construction. The result is a modern kitchen that feels organized, welcoming, practical, and Pinterest-worthy while making the most of every available inch.
1. Create a Minimalit Floating Shelf Storage Wall
Floating shelves are one of the easiest ways to introduce modern character into a small kitchen while gaining useful storage. Instead of treating shelves as purely decorative features, design them as a combination of display and organization. A blank wall that previously served no practical purpose can become a compact storage station for frequently used kitchenware, spices, cookbooks, mugs, jars, and decorative accessories.
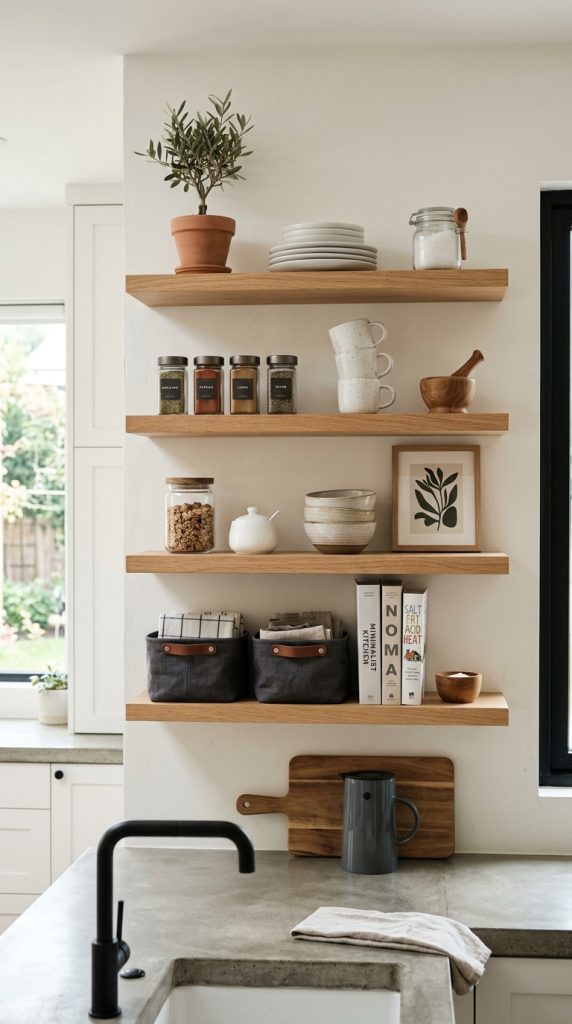
The modern look comes from keeping the arrangement intentional. Rather than filling every inch of each shelf, leave some breathing room between objects. This prevents the wall from appearing visually heavy. Choose shelves in a finish that complements the existing kitchen. Light oak or natural wood creates warmth against white cabinets, while black shelves can provide a sophisticated contrast. White shelves blend into pale walls and create a nearly built-in appearance.
What to use
- Two to four floating shelves
- Wall anchors appropriate for your wall type
- Small storage baskets
- Matching glass jars
- Neutral-toned containers
- A few favorite mugs
- Small decorative bowls
- One or two plants or herbs
- Cookbooks
- A decorative cutting board
Step-by-step approach
Begin by choosing a wall that is close to the area where the stored items will be used. For example, shelves near the preparation area are ideal for spices, oils, cutting boards, and cooking ingredients. Shelves near a coffee station can hold mugs, coffee containers, and small accessories.
Measure the wall carefully before purchasing shelves. In a compact kitchen, proportion matters. Oversized shelves can make the space feel crowded, while shelves that are too short may look disconnected from the surrounding cabinetry.
Install the shelves at comfortable heights. Frequently used items should be easy to reach, while decorative or less frequently used pieces can occupy the upper shelf.
Use containers to create visual consistency. If you store flour, sugar, rice, pasta, or coffee on the shelves, transferring them into matching jars instantly gives the kitchen a more polished appearance.
Finally, style the shelves using a simple rhythm: functional item, decorative item, functional item. This keeps the arrangement useful without making it look like a storage closet.
The biggest advantage of this idea is flexibility. You can change the contents seasonally, reorganize them as your needs change, or use removable shelving solutions when decorating a rental kitchen. A floating shelf wall can become both a practical storage solution and one of the strongest visual features in a small modern kitchen.
2. Turn the Side of a Cabinet Into a Hidden Storage Zone
The side of a kitchen cabinet is frequently overlooked, especially in compact kitchens where every inch matters. If a cabinet sits against an exposed wall or has a visible side panel, that narrow surface can become an excellent location for small storage. This is particularly useful for spices, measuring spoons, cooking utensils, paper towels, or frequently used ingredients.
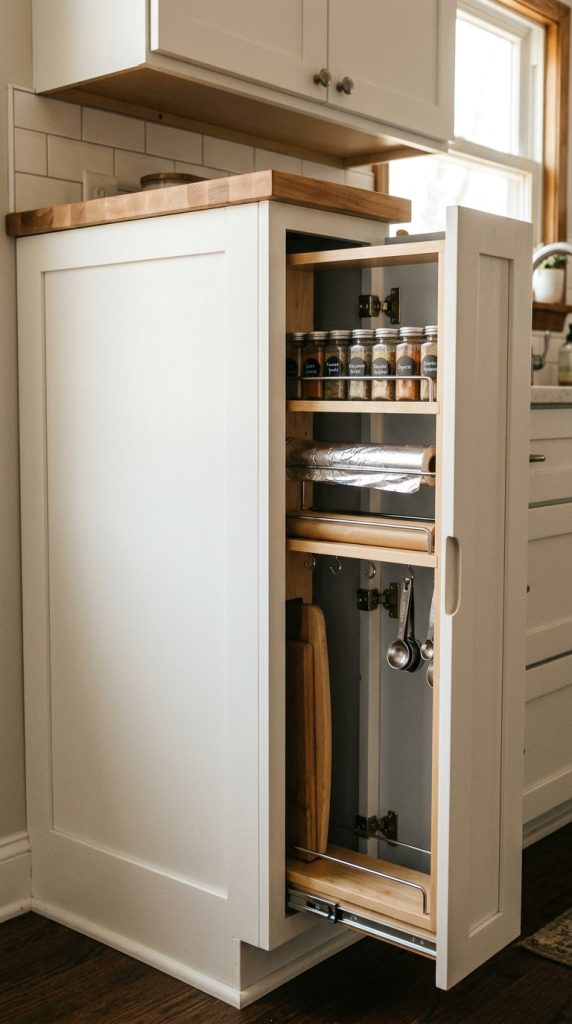
The trick is to make the storage look intentional rather than improvised. Modern kitchens benefit from slim organizers with clean lines and minimal visual clutter. A narrow rail system, shallow shelves, adhesive hooks, or a slim vertical rack can transform an unused cabinet side without requiring major renovation.
Useful materials
- Slim wall-mounted rack
- Small metal rail
- Adhesive hooks
- Narrow baskets
- Spice containers
- Small wooden pegs
- Measuring spoon hooks
- Compact paper towel holder
- Labels
- Removable mounting strips
Step-by-step organization
First, examine the exposed cabinet side and decide what type of items would benefit most from being stored there. Avoid placing bulky objects on this surface. The best candidates are thin or lightweight items.
If you frequently use spices, install a narrow rack and organize spices alphabetically or according to frequency of use. If cooking utensils are the main problem, a small rail with hooks may work better.
For renters, removable adhesive organizers can provide a temporary option. Always check the weight limit and the manufacturer’s recommendations before attaching anything.
Choose a limited color palette. Black metal against a white cabinet creates a crisp modern appearance, while brushed brass can add warmth and sophistication. Natural wood accents can soften a minimalist kitchen.
Another useful trick is to reserve the lowest section for items that need to be accessed often. Place rarely used ingredients higher up.
Labels can help maintain order, but avoid excessive labeling. A few consistent labels on matching containers look much more modern than dozens of different stickers.
This solution is especially valuable because it creates storage without taking away from the countertop or floor area. It can also make cooking more convenient by keeping small essentials close to the work zone.
For a Pinterest-inspired appearance, photograph the cabinet side as part of the overall kitchen rather than making it look like a separate storage station. When colors, materials, and containers coordinate with the rest of the kitchen, even this tiny organizational area can contribute to the room’s overall decor.
3. Design a Slim Rolling Pantry for Narrow Spaces
A narrow gap between appliances or cabinets can become one of the most useful storage areas in a small kitchen. Instead of allowing the space to remain empty, consider adding a slim rolling pantry. These compact units are designed to slide into narrow gaps and provide several levels of vertical storage.
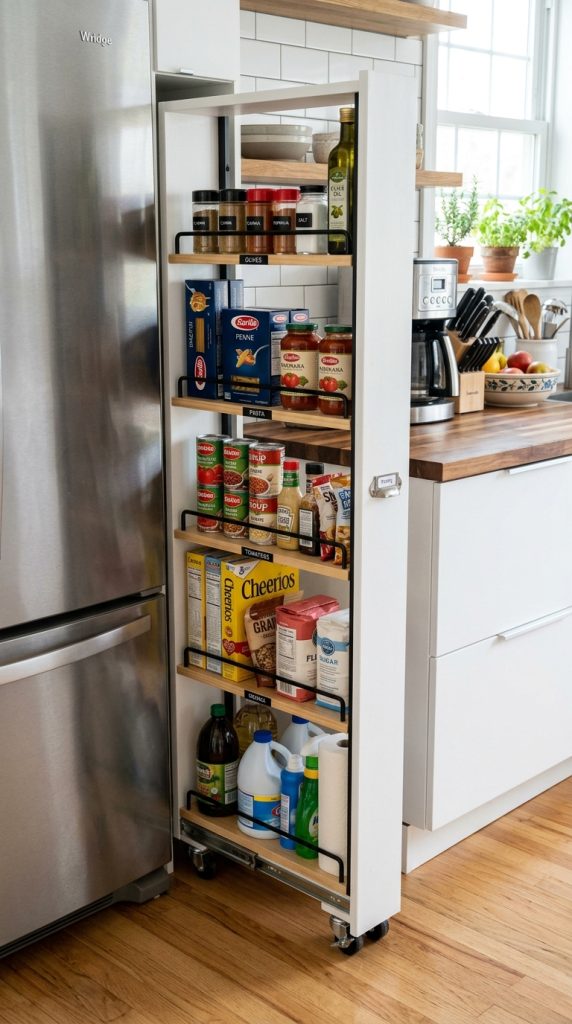
This is particularly useful for dry goods, spices, bottles, canned foods, baking ingredients, and cleaning supplies. Because the pantry can roll outward, items at the back become much easier to reach than they would be in a deep cabinet.
Materials and supplies
- Slim rolling pantry
- Measuring tape
- Storage bins
- Small labels
- Matching food containers
- Non-slip shelf liner
- Optional dividers
- Small baskets
How to create the storage zone
Start by measuring the gap at its narrowest point. Do not assume that a space that looks wide enough will accommodate a storage unit. Measure the width, depth, and available height carefully.
Once you have selected a suitable rolling unit, decide how each level will be used. The lower shelf can hold heavier cans or bottles. Middle shelves are useful for frequently used pantry items. Upper shelves can store lighter ingredients.
Avoid putting too many items on the shelves. The purpose of a rolling pantry is accessibility, not simply maximizing capacity.
Group similar items together. For example, dedicate one shelf to baking supplies, another to sauces and condiments, and another to packaged foods.
Use bins for small packages. This prevents individual packets from falling behind the pantry or becoming difficult to find.
For a more modern appearance, choose a pantry with a simple frame and neutral-colored containers. If the unit is visible when pulled out, consistency matters.
One of the most important benefits is that a rolling pantry can eliminate the need to overcrowd existing cabinets. It creates additional vertical storage while occupying very little floor space.
This idea works especially well in apartments and narrow galley kitchens. It can also be adapted for cleaning supplies if the location is close to the sink. Just keep food storage and cleaning chemicals separated.
A slim pantry is more than an organization trick; it changes the way you think about unused space. A gap that once looked too narrow to matter can become a valuable storage zone, making a small kitchen feel considerably more functional.
4. Build a Compact Coffee Station With Vertical Storage
A small coffee station can make a modern kitchen feel personalized while organizing one of the most commonly cluttered areas. Coffee makers, mugs, coffee bags, sweeteners, filters, spoons, and syrups can quickly consume valuable counter space. The solution is to create a compact beverage station that combines countertop function with vertical organization.

The goal is to make the station visually attractive enough to feel like decor while ensuring that everything needed for coffee preparation has a dedicated location.
Things to include
- Compact coffee machine
- Two or three favorite mugs
- Small mug hooks
- Coffee canister
- Sugar container
- Small tray
- Narrow shelf
- Coffee scoop
- Decorative jar
- Small plant
- Optional drawer organizer
Step-by-step setup
Choose a corner of the countertop that is already close to an electrical outlet. Keep the coffee machine as the primary focal point.
Place the machine on a small tray if you want the station to look more organized. A wooden tray adds warmth, while a stone or ceramic tray creates a cleaner contemporary look.
Install a small shelf above the station if wall space allows. Store coffee beans, mugs, or decorative pieces there.
Hooks underneath the shelf can hold mugs, freeing valuable cabinet space. Choose mugs that coordinate with the kitchen rather than displaying every mug you own.
Use one attractive container for coffee and another for sugar or sweetener. This reduces the number of branded packages visible on the counter.
Keep only daily essentials in this area. Extra filters, backup coffee bags, and rarely used accessories should be stored elsewhere.
For a particularly small kitchen, choose a vertical arrangement. The machine occupies the lower level, mugs hang above it, and coffee supplies sit on the upper shelf.
This setup creates a mini destination within the kitchen. It is both functional and visually appealing, which makes it especially suitable for Pinterest-style home organization content.
The most important principle is restraint. A coffee station should not become another cluttered countertop. Limit the displayed items to those you actually use and a few decorative accents.
With thoughtful organization, even a tiny corner can become a beautiful morning routine station while simultaneously freeing cabinet and countertop space.
5. Use the Inside of Cabinet Doors for Extra Organization
Cabinet doors provide hidden storage that is often completely ignored. Because the storage remains behind the closed door, it is particularly effective for small kitchens where maintaining clean visual lines is important.
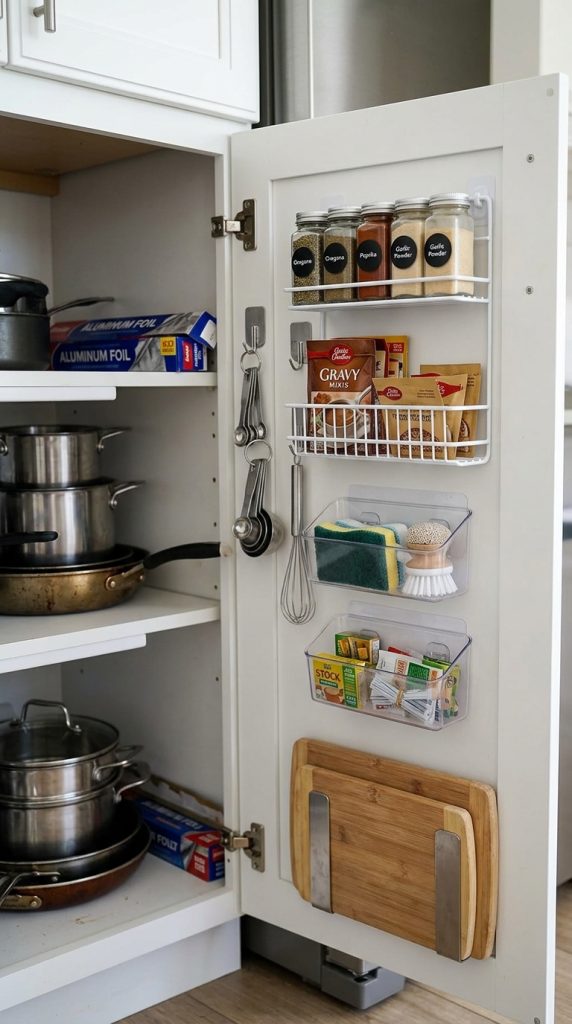
The inside of a cabinet door can hold measuring cups, pot lids, spices, cutting boards, cleaning brushes, food wraps, or small kitchen tools. The best choice depends on the cabinet and what is already stored inside it.
Storage materials
- Over-the-door organizer
- Adhesive hooks
- Slim wire rack
- Small clips
- Measuring cup hooks
- Spice pockets
- Removable adhesive strips
- Labels
- Small bins
How to organize it
Begin with one cabinet rather than trying to modify every door. Empty the cabinet and identify the items that create the most frustration.
For example, if measuring cups are constantly buried in drawers, attach small hooks to the inside of the cabinet door and hang them there.
If you are organizing food wrap, use a slim holder designed for the cabinet door. Make sure the door can close completely before adding more items.
For cleaning supplies, an under-sink cabinet door is often ideal. Small brushes, sponges, gloves, and cloths can be stored in narrow holders.
Do not overload the door. Excess weight can affect hinges and make the cabinet difficult to operate.
The visual advantage of this solution is that the kitchen remains uncluttered when the cabinets are closed. Everything disappears behind a clean cabinet facade.
For renters, removable hooks and adhesive organizers can provide a less permanent option, although the surface should always be tested according to the product instructions.
This storage strategy is particularly useful for small objects because it takes advantage of vertical space that would otherwise remain unused.
A modern kitchen should not only look organized from the outside. It should also work efficiently when you open the cabinets. Interior door storage makes everyday tasks easier because small tools can be placed exactly where they are needed.
Once you discover how much space is available inside cabinet doors, you may find that you need fewer bulky countertop organizers.
6. Create a Modern Pegboard Kitchen Organization Wall
A pegboard can turn a blank kitchen wall into a flexible storage and decor feature. Although pegboards were traditionally associated with workshops and utility rooms, modern versions can look surprisingly sophisticated when styled thoughtfully.
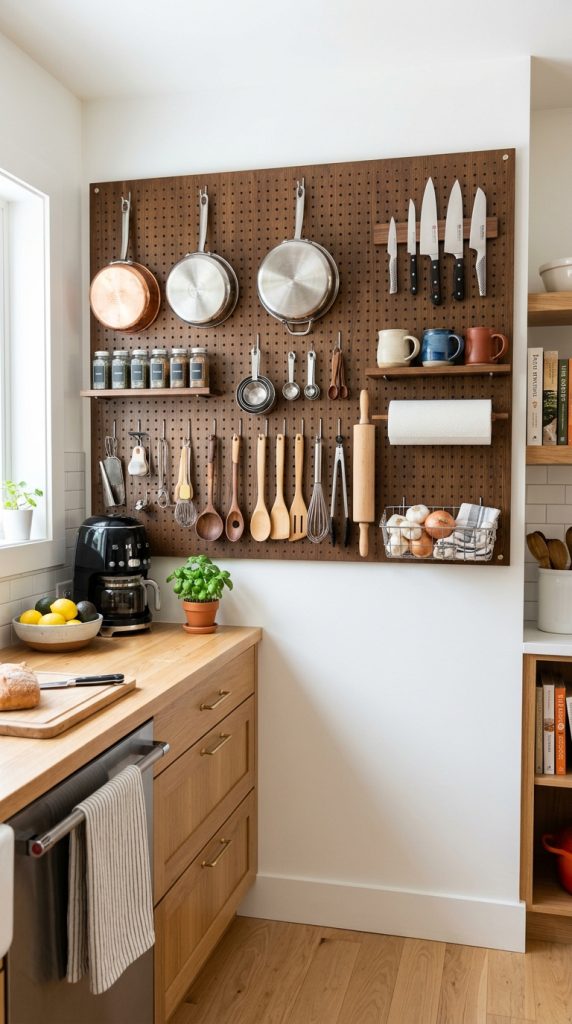
The greatest advantage is flexibility. Hooks, shelves, baskets, and holders can be moved whenever your storage needs change.
What you need
- Kitchen-safe pegboard
- Mounting hardware
- Hooks
- Small shelves
- Wire baskets
- Wooden pegs
- Measuring tape
- Level
- Lightweight kitchen tools
- Optional framed artwork
Step-by-step method
Choose a wall that is close to your cooking or preparation area. Avoid placing the pegboard somewhere that will interfere with cabinet doors or walking paths.
Measure the wall before choosing the board. A compact rectangular board is often better for a small kitchen than a large full-wall installation.
Install the board securely according to the manufacturer’s instructions. Once mounted, begin with the items you use most frequently.
Hang wooden spoons, spatulas, whisks, measuring tools, scissors, and lightweight pans where appropriate.
Add one or two small shelves for jars or decorative objects.
The secret to making a pegboard look modern is repetition. Use hooks and accessories in a consistent finish. Black hardware creates a dramatic modern appearance, while natural wood accessories create a softer Scandinavian-inspired effect.
Do not fill every hole. Negative space helps the display look intentional.
You can also combine practical storage with decorative elements. A small plant, framed print, or attractive cutting board can break up the collection of tools.
The layout should reflect how you cook. Place frequently used utensils near the center or lower section, while occasional tools can occupy higher areas.
A pegboard also works well for small kitchens because it shifts storage from horizontal surfaces to vertical ones. Instead of covering the counter with utensil holders, you can move many of those items onto the wall.
This idea is especially appealing for Pinterest because the transformation is easy to demonstrate visually: a blank wall becomes an organized, attractive kitchen command center.
7. Add a Built-In-Looking Bench With Hidden Storage
If your kitchen includes a small dining corner, breakfast nook, or unused wall area, a storage bench can provide both seating and hidden organization. This is an excellent solution for kitchens that need additional storage but do not have room for another cabinet.
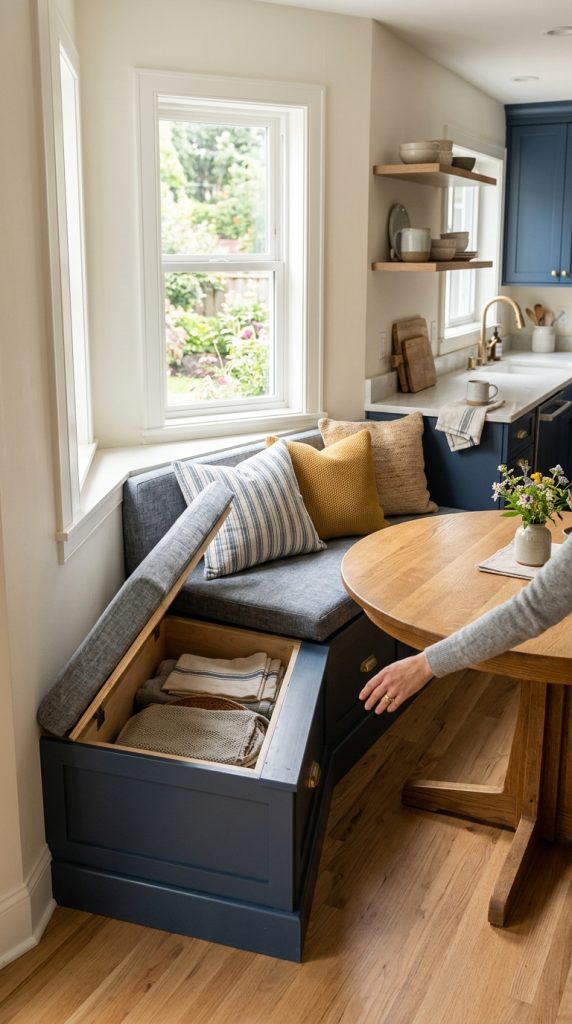
A bench can store table linens, small appliances, serving dishes, cookware, or pantry backups. The outside should remain simple so that it blends naturally with the kitchen decor.
Materials to consider
- Compact storage bench
- Removable seat cushion
- Neutral fabric
- Storage baskets
- Decorative pillows
- Hinged or lift-up seat
- Small dining table
- Wall art
- Optional floating shelf
Creating the space
First, identify whether your kitchen actually has enough clearance for a bench. Measure the area carefully, including the distance required for people to sit and move around the table.
Choose a bench with internal storage or use baskets underneath an open design.
If the bench has a lift-up seat, divide the interior into categories. For example, one section can store table linens, while another can hold serving pieces.
Use fabric in a neutral color to maintain a modern appearance. Cream, beige, soft gray, or muted green can work beautifully with contemporary kitchens.
Avoid oversized cushions or too many pillows because they can make a compact area feel crowded.
A narrow floating shelf above the bench can provide additional vertical storage or display space. However, keep the shelf lightly decorated.
The combination of seating and storage is particularly valuable because one piece of furniture performs two functions.
For very small homes, this principle is essential. Instead of asking where to add another storage unit, ask whether existing furniture can perform a second job.
A storage bench can also visually anchor a dining nook, making the kitchen feel more finished and intentional.
When styled with a simple table, warm lighting, and one or two decorative elements, the area becomes more than a storage solution. It becomes a cozy feature that adds personality without consuming unnecessary space.
8. Organize the Under-Sink Area With Pull-Out Storage
The space underneath the kitchen sink is usually one of the most difficult areas to keep organized. Plumbing pipes create awkward shapes, cleaning products become scattered, and small items can disappear into dark corners.
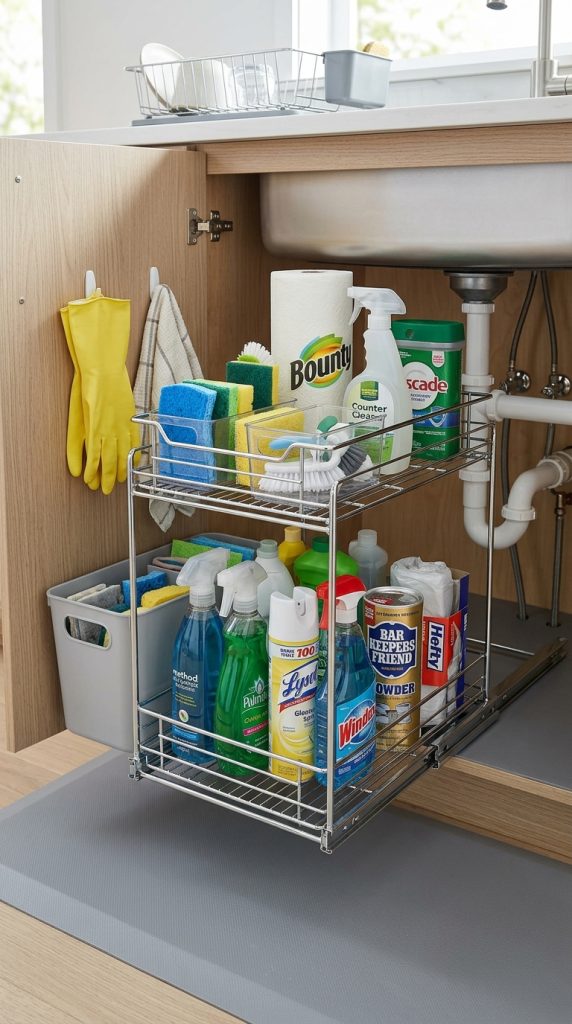
A modern small kitchen benefits from treating this cabinet as a dedicated utility zone rather than allowing it to become a miscellaneous storage area.
Storage supplies
- Pull-out organizer
- Stackable bins
- Small cleaning caddy
- Microfiber cloths
- Reusable gloves
- Brush holder
- Trash-bag dispenser
- Labels
- Shelf liner
- Small hooks
Step-by-step organization
Empty the entire cabinet first. Discard empty containers and move unrelated items elsewhere.
Measure around the plumbing pipes before purchasing an organizer. A standard rectangular bin may not fit around the pipes, so adjustable or narrow designs can be more effective.
Create categories. Keep dishwashing supplies together, cleaning cloths together, and backup products together.
A pull-out organizer is especially helpful because it brings items toward you instead of forcing you to reach into the back of the cabinet.
Use a small caddy for products that you regularly move around the kitchen. This allows you to carry several items at once.
Attach lightweight hooks to the cabinet wall or door for gloves and brushes if appropriate.
Use a shelf liner to make cleaning spills easier.
Avoid storing too many products. Under-sink cabinets become difficult to maintain when they are filled beyond capacity.
The modern design principle here is hidden simplicity. Nothing needs to be displayed because the entire storage system is concealed behind the cabinet door.
Once organized, the under-sink area becomes much easier to clean and maintain.
This idea is especially useful for beginners because it does not require changing the appearance of the kitchen. You are simply improving an existing storage area.
It can also inspire a broader decluttering strategy: instead of purchasing more containers immediately, first remove items you no longer use. Better organization often comes from owning fewer unnecessary items rather than adding more storage products.
9. Install a Magnetic Storage System for Small Kitchen Tools
Magnetic storage can be a smart solution when drawers and cabinets are already full. A magnetic strip or magnetic organizer can hold lightweight metal kitchen tools while keeping them visible and accessible.
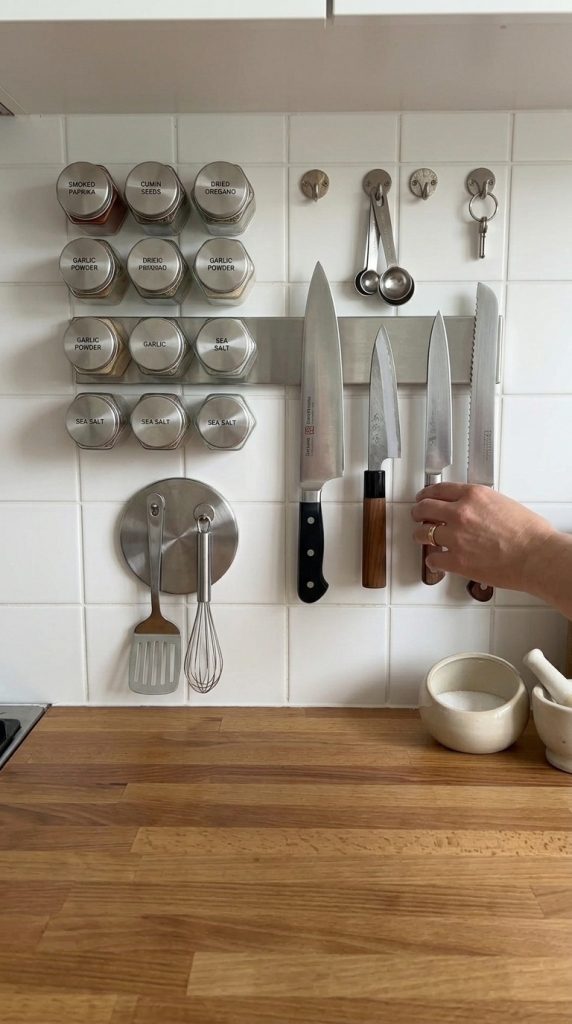
The concept works particularly well in modern kitchens because the storage system can have a sleek, minimalist appearance.
Items you may use
- Magnetic kitchen strip
- Strong mounting hardware
- Metal measuring spoons
- Small metal utensils
- Kitchen scissors
- Lightweight tools
- Magnetic containers
- Spice tins
- Labels
- Optional small hooks
How to make it work
Choose a wall section that is close to the preparation area but does not interfere with cooking or movement.
Before installing anything, check the manufacturer’s recommended weight capacity and make sure the mounting method is suitable for your wall.
Start with a few lightweight tools rather than hanging everything immediately.
Arrange the tools according to frequency of use. Your everyday utensils should be easiest to reach.
Magnetic spice containers can also be useful if they are designed specifically for kitchen use. They can turn an unused vertical surface into a compact spice display.
To preserve the modern appearance, avoid mixing too many finishes. A single metal finish often looks more cohesive.
The system should remain visually balanced. If one side of the strip is overloaded while the other is empty, redistribute the tools.
Magnetic storage is particularly valuable in kitchens with limited drawer space. It moves selected items onto the wall without requiring additional cabinetry.
However, safety should remain the priority. Avoid placing sharp or heavy objects where they could fall into food preparation areas or be reached accidentally by children.
The beauty of this approach is that it combines function and decoration. Carefully arranged kitchen tools can create a subtle professional-kitchen aesthetic.
For Pinterest content, this concept also has strong organizational appeal because it demonstrates a simple transformation from cluttered drawers to accessible vertical storage.
Used selectively, magnetic storage can make a small kitchen feel more spacious because it reduces the number of objects competing for countertop and drawer space.
10. Create a Multi-Functional Countertop Storage Station
The final idea for Part 1 is to create a compact countertop station that combines several functions in one carefully organized area. This is particularly effective for kitchens where there is not enough room for separate coffee stations, cooking organizers, fruit storage, and decorative displays.
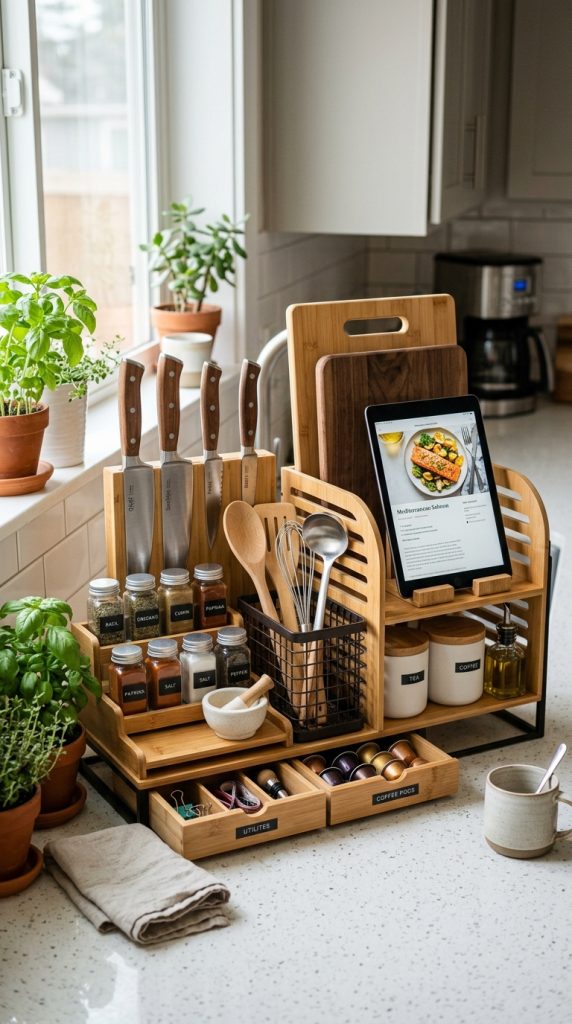
Instead of placing individual containers across the entire countertop, group related items onto one attractive tray or compact organizer.
Things to include
- Large decorative tray
- Small utensil container
- Oil and vinegar bottles
- Salt and pepper
- Small cutting board
- Fruit bowl
- Compact canisters
- Herb pot
- Small decorative object
- Optional tiered organizer
Step-by-step setup
Choose one countertop section to become your organized station. The first step is removing everything from the area.
Only return items that you use regularly.
Place a tray underneath related products. For example, cooking oils, salt, pepper, and everyday seasonings can sit together.
If countertop space is extremely limited, use a tiered organizer. The upper level can hold smaller containers while the lower level stores larger bottles.
Keep the tallest items toward the back and shorter items toward the front. This creates a cleaner visual hierarchy.
Add one decorative feature such as a small herb plant, ceramic container, or wooden utensil holder.
Avoid filling the station simply because space is available. Empty space is part of modern kitchen decor.
The countertop should remain usable for food preparation. If your station takes over the entire work surface, it has become counterproductive.
A unified station can also create a visual focal point. Instead of having random objects scattered around the kitchen, the eye sees one deliberate arrangement.
Choose materials that complement the rest of your kitchen. Wood, ceramic, glass, stainless steel, and matte finishes can all work together when used thoughtfully.
This approach is particularly beginner-friendly because it requires no permanent installation. You can experiment with the layout, change the containers, or move the station whenever your needs change.
The larger lesson is that small kitchens benefit from grouping rather than scattering. When similar items live together, the kitchen becomes easier to use and easier to clean.
A thoughtfully designed countertop station can therefore serve as both a storage solution and a decorative element, helping a compact kitchen feel polished without making it feel overdecorated.
11. Use Vertical Cabinet Extensions for Extra Kitchen Storage
When a small kitchen feels short on storage, the first instinct is often to add another cabinet or purchase a larger storage unit. Before doing that, look upward. The vertical space above existing cabinets can become surprisingly useful when it is designed intentionally. In many kitchens, the area between the top of the cabinets and the ceiling is either completely empty or used to collect decorative objects that are difficult to clean. Turning part of this vertical area into organized storage can increase capacity without taking away valuable floor or countertop space.
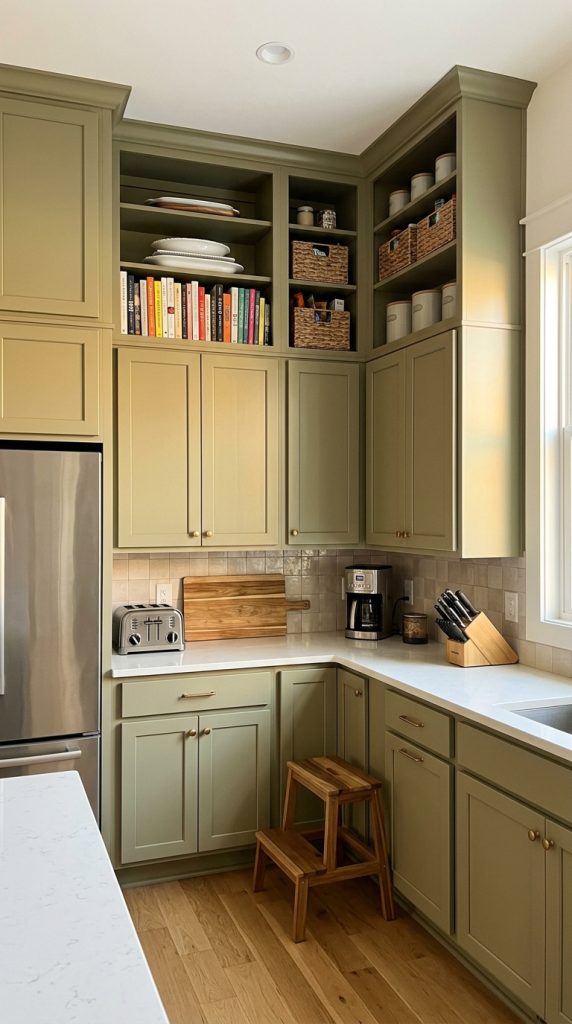
This idea works particularly well for items that are used occasionally, such as serving platters, seasonal dishes, extra baking supplies, large bowls, picnic accessories, or entertaining pieces. The key is to avoid storing everyday essentials in places that require a step stool.
Materials and things to use
- Stackable storage boxes
- Lidded baskets
- Uniform woven baskets
- Clear containers
- Lightweight risers
- Labels
- Small step stool
- Cabinet-top shelving
- Decorative storage boxes
- Non-slip shelf liner
Step-by-step setup
Begin by measuring the empty space above your cabinets. Pay attention to both height and depth. If the area is dusty, clean it thoroughly before adding storage.
Choose containers that have a consistent appearance. Matching baskets create a cleaner modern look than a collection of unrelated cardboard boxes. If you prefer to see what is inside, clear containers can be practical, but use them selectively because too many visible containers can make the kitchen look busy.
Group items according to how often they are used. Seasonal serving dishes can go toward the back, while larger backup supplies can stay in accessible positions.
If your cabinets do not extend all the way to the ceiling, consider a lightweight shelving extension or cabinet-top organizer. Make sure anything installed is securely supported and appropriate for the structure.
For a polished appearance, do not fill the entire area with storage. Leave enough visual space for the kitchen to feel intentional.
A simple row of matching baskets can actually become a decorative feature. Choose warm beige, natural fiber, white, or a color that complements your cabinets.
This idea is especially helpful in kitchens with limited cabinet capacity because it creates storage without changing the existing layout. It also encourages a useful habit: storing occasional items higher while keeping everyday tools at comfortable reach.
For safety, avoid storing heavy glassware or unstable objects overhead. Lightweight, infrequently used items are the better choice.
The result is a kitchen that uses its full vertical footprint while maintaining the clean, uncluttered appearance associated with modern design.
12. Transform an Empty Corner Into a Slim Kitchen Storage Tower
Corners are among the most underused areas in compact kitchens. A corner may be too narrow for a standard cabinet but still large enough for a slim vertical storage tower. Instead of allowing this awkward space to remain empty, turn it into a dedicated zone for pantry goods, appliances, cookbooks, serving dishes, or decorative kitchen accessories.
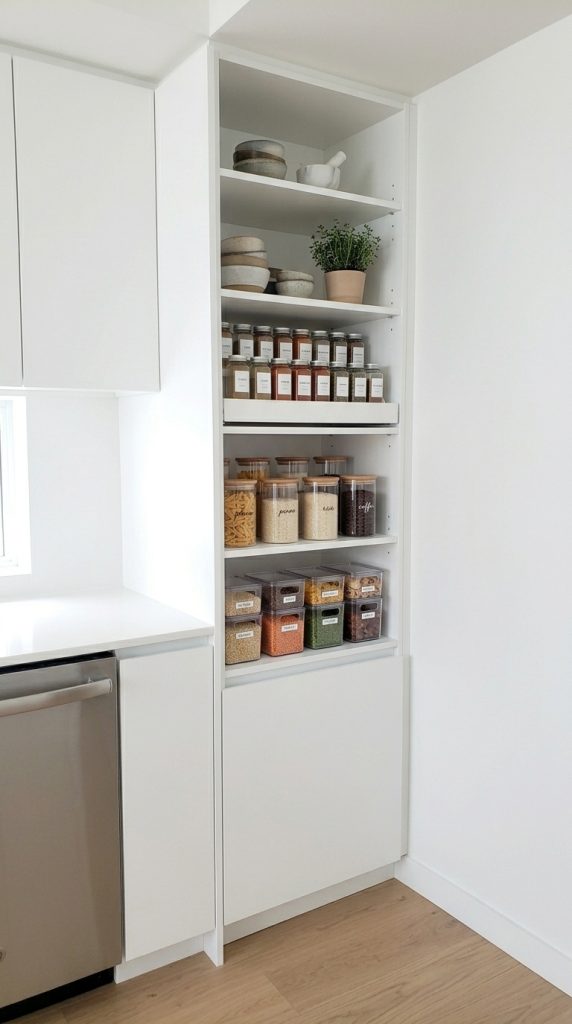
A narrow tower is especially useful because it takes advantage of height rather than width. This makes it appropriate for apartments, galley kitchens, narrow kitchens, and open-plan spaces where floor space is limited.
Things and materials to consider
- Slim vertical shelving unit
- Narrow cabinet
- Adjustable shelves
- Storage baskets
- Clear food containers
- Decorative jars
- Cookbooks
- Small appliance storage
- Labels
- Non-slip shelf liners
Step-by-step organization
Start by identifying exactly what the corner should store. Avoid buying a tower before deciding its purpose. If the main problem is pantry overflow, use adjustable shelves and containers. If appliances are taking over the counter, choose deeper shelves that can accommodate them.
Measure the corner carefully. Check the distance from nearby doors, drawers, appliances, and walkways. A storage tower should improve the kitchen rather than create an obstruction.
Choose a design that matches your existing cabinetry. A white tower can visually disappear into a light kitchen, while natural wood can create warmth. Black shelving provides stronger contrast and can work particularly well with modern industrial decor.
Keep heavy objects on lower shelves. Middle shelves can hold frequently used items, while decorative pieces and occasional-use items can occupy the top.
Use baskets to group small packages. Without containers, a narrow tower can quickly become visually chaotic.
For open shelving, limit the color palette. Neutral containers, wooden accessories, and a few ceramic pieces can make the unit feel like part of the kitchen design.
If you prefer a cleaner appearance, choose a cabinet with doors. Closed storage is especially helpful if the items being stored are visually mismatched.
One useful strategy is to create a “backup zone.” Store extra paper products, unopened pantry staples, specialty cooking ingredients, or serving supplies in the tower rather than spreading them throughout the kitchen.
This creates a practical storage system while keeping the main cabinets dedicated to everyday items.
A narrow storage tower proves that a difficult corner does not necessarily need to be remodeled. With careful measurements and thoughtful organization, even a small unused section of the kitchen can become an attractive and hardworking storage feature.
13. Add Drawer Dividers for a Calm, Organized Kitchen
Drawers are excellent storage spaces, but without internal organization they can become one of the biggest sources of hidden clutter. Utensils overlap, measuring spoons disappear, gadgets become difficult to identify, and every time you open a drawer you have to search for what you need.

Modern kitchen organization works best when drawers are divided into small functional zones. Drawer dividers are simple, affordable, and beginner-friendly because they do not require construction or major changes to the kitchen.
Useful materials
- Adjustable drawer dividers
- Bamboo organizers
- Expandable trays
- Small containers
- Utensil separators
- Labels
- Non-slip liner
- Measuring tape
- Small kitchen bins
Step-by-step drawer organization
Remove everything from one drawer at a time. Do not attempt to organize every drawer simultaneously.
Sort the contents into categories such as cooking utensils, measuring tools, serving utensils, gadgets, or miscellaneous items.
Discard duplicates and relocate objects that do not belong in that drawer.
Measure the drawer interior, including its height. This prevents you from buying an organizer that prevents the drawer from closing.
Choose adjustable dividers when possible. They allow you to customize compartments around your actual utensils rather than forcing your items into fixed spaces.
Place frequently used tools toward the front. Less frequently used items can go toward the back.
Use narrow sections for measuring spoons and small utensils. Larger compartments can hold spatulas, tongs, or whisks.
For a modern appearance, bamboo or neutral-colored organizers can add warmth. Clear organizers are practical but can create a more utilitarian appearance.
Avoid creating too many tiny compartments. The purpose of organization is to make items easier to find, not to make the drawer complicated.
Once the drawer is organized, test it for several days. If you constantly return an item to the wrong compartment, the layout may need to change.
This system can make a surprisingly large difference in a small kitchen because efficient drawers reduce the need for additional countertop storage. When utensils have defined homes, you are less likely to leave them scattered around the cooking area.
Drawer organization also makes cleaning easier. Instead of removing an entire collection of loose tools, you can lift an organizer or clean one designated compartment.
For Pinterest-worthy results, focus on consistency. Matching organizers, clean lines, and carefully grouped utensils create the satisfying visual order that makes small-space organization content especially appealing.
14. Create a Hidden Appliance Garage to Free Counter Space
Small appliances can consume a huge amount of countertop space. Toasters, blenders, coffee equipment, food processors, and mixers are useful, but when they remain permanently visible, even a well-decorated kitchen can feel crowded.

An appliance garage provides a solution by giving frequently used appliances a dedicated concealed home. It can be created inside an existing cabinet, beneath a counter, or within a specially designed storage section.
Materials and items
- Appliance cabinet or storage compartment
- Roll-up door or lift-up door
- Electrical outlet
- Cable clips
- Non-slip mat
- Small appliance
- Adjustable shelf
- Compact storage basket
How to create the zone
Begin by identifying the appliances that you use often enough to justify countertop access but do not want permanently displayed.
Measure the appliance dimensions, including its cord and any parts that need to remain attached.
Choose a cabinet or compartment with sufficient ventilation and clearance. Electrical appliances should be stored and operated according to their safety instructions. Do not modify electrical wiring unless the work is performed by an appropriately qualified professional.
Use cable clips to prevent cords from becoming tangled.
A non-slip mat can help protect the surface and keep smaller appliances stable.
If your kitchen already has a deep cabinet, consider dedicating one section to appliances. Place the heaviest appliance on the bottom and lighter equipment above.
For a truly modern appearance, use a door that matches the cabinetry. When closed, the appliance disappears completely.
If you are planning a kitchen renovation, an appliance garage can be incorporated directly into the cabinetry design. For a rental or budget makeover, a freestanding cabinet or carefully selected countertop organizer may achieve a similar result.
The important principle is accessibility. Hidden storage is only useful if retrieving the appliance does not become frustrating. Frequently used items should remain easy to access.
A compact appliance garage can dramatically improve the visual appearance of a small kitchen. Once several bulky appliances disappear behind a cabinet front, the countertop immediately looks larger.
This is also a good example of modern design thinking: rather than eliminating useful appliances, design the storage system around them.
The kitchen remains practical while maintaining a cleaner appearance. With fewer objects visible, decorative elements such as a plant, pendant light, backsplash, or carefully styled tray have more visual impact.
15. Turn the Kitchen Backsplash Into a Functional Storage Area
A backsplash does not have to be purely decorative. In a small kitchen, the wall between the countertop and upper cabinets can become valuable vertical storage when accessories are selected carefully.
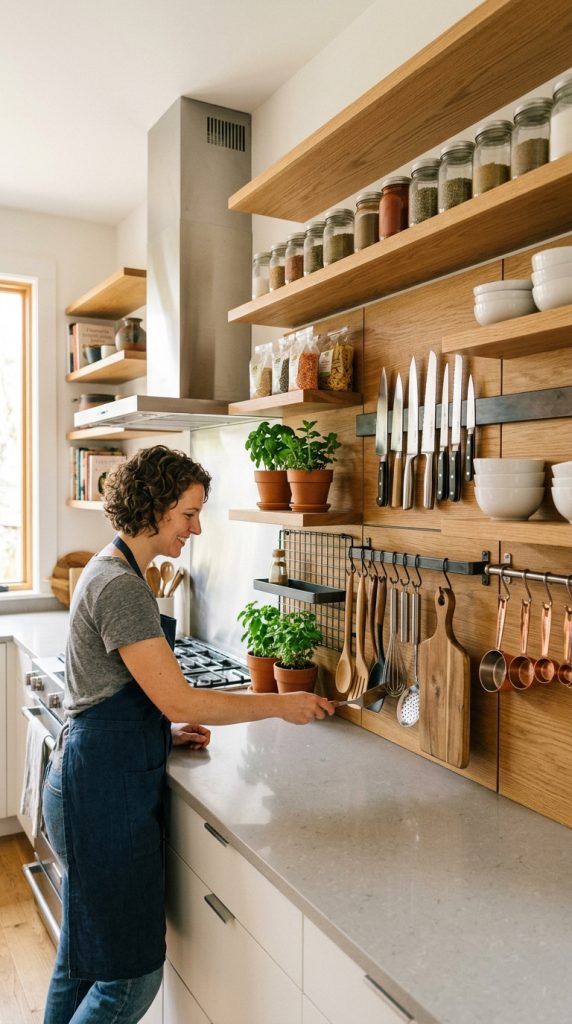
Instead of covering the backsplash with hooks and organizers everywhere, create a small functional section. A slim rail can hold cooking utensils, small shelves can display spices, or magnetic containers can keep frequently used ingredients accessible.
Materials to consider
- Slim kitchen rail
- Small hooks
- Magnetic containers
- Narrow spice shelves
- Lightweight baskets
- Measuring spoons
- Cooking utensils
- Small herb containers
- Wall-safe mounting hardware
Step-by-step approach
First, identify what is currently taking up too much drawer or countertop space. Those items should become the priority for backsplash storage.
A cooking rail can hold a few everyday utensils such as a whisk, spatula, or ladle. Avoid hanging too many objects because the backsplash can quickly become visually overwhelming.
If spices are the main problem, install a shallow rack. Keep frequently used spices near the cooking zone.
Magnetic containers can provide another streamlined option. Choose matching containers if you want the system to look like part of the decor.
Consider the existing backsplash material before drilling. Tile, stone, glass, and painted surfaces may require different installation approaches. For rental kitchens, removable solutions may be preferable.
Keep objects away from direct heat sources and follow product installation instructions.
The visual secret is restraint. A modern backsplash storage system should look curated rather than crowded.
For example, a short black rail with five carefully selected wooden utensils can create a sophisticated contrast against a light backsplash. A narrow brass shelf with matching spice jars can create a warmer appearance.
This approach also makes cooking easier because frequently used tools remain within reach.
One advantage of backsplash storage is that it preserves cabinet and drawer capacity for other categories. You are effectively creating a new storage layer without adding furniture.
However, remember that the backsplash is exposed to cooking splashes. Items stored there should be easy to clean, and delicate decorative objects should be positioned away from areas where grease or water is likely to reach them.
When designed thoughtfully, the backsplash can become one of the most functional and visually interesting surfaces in a small modern kitchen.
16. Use Tiered Organizers Inside Deep Cabinets
Deep cabinets often look spacious but can actually waste storage because items disappear behind one another. You may have enough cabinet volume but still struggle to find what you need.
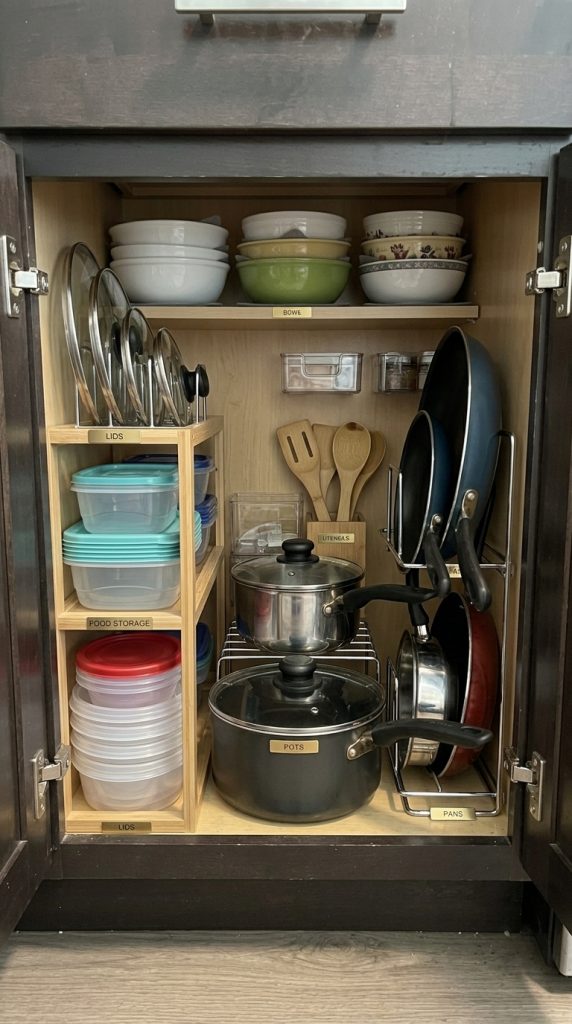
Tiered organizers solve this problem by creating multiple visual levels. Instead of placing cans, jars, sauces, or containers in one flat row, you can raise items toward the back so everything remains visible.
Things to use
- Tiered shelf risers
- Expandable cabinet organizers
- Can organizers
- Lazy Susan
- Clear bins
- Small baskets
- Shelf liner
- Labels
- Measuring tape
Step-by-step method
Remove everything from the cabinet before organizing it. Group similar products together.
Measure the cabinet’s width, depth, and height. Pay special attention to the distance between shelves.
Choose a tiered organizer appropriate for the cabinet category. A stepped riser works well for cans and jars, while a rotating organizer can be useful for bottles and condiments.
Place the most frequently used products toward the front or on the most accessible level.
Keep heavier products on stable surfaces.
If using bins, choose containers that can be pulled out easily. A bin can function as a drawer within a cabinet, allowing you to access multiple small items at once.
Use labels when several categories look similar.
Avoid overfilling the cabinet. You should be able to remove one item without knocking over several others.
For a modern aesthetic, neutral baskets and clear containers can create visual consistency. However, there is no need to transfer every food item into decorative containers. Focus on the categories that genuinely benefit from containerization.
A tiered system is particularly effective for small kitchens because it improves the storage capacity you already have. You may discover that you do not actually need additional cabinetry; you simply needed to use the existing space more efficiently.
This is an important distinction when decorating a compact kitchen. Buying more storage products without fixing the underlying organization can make the kitchen feel even more crowded.
Start with cabinet efficiency before purchasing additional furniture.
Once the cabinet is arranged in levels, everything becomes easier to see. The kitchen feels more organized because visual clutter is reduced inside the cabinets as well as outside them.
17. Add a Fold-Down Preparation Table or Counter Extension
A small kitchen sometimes has enough storage but not enough working surface. When countertop space is limited, a fold-down table or counter extension can provide additional preparation space only when needed.
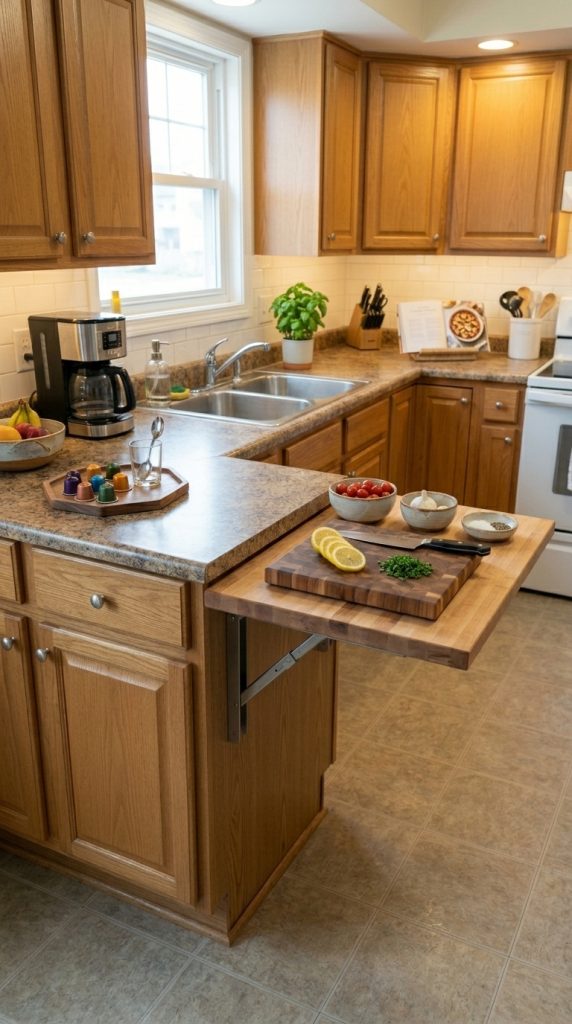
This multifunctional approach is ideal for compact apartments, narrow kitchens, and homes where a permanent island would make the room difficult to navigate.
Materials and items
- Wall-mounted folding table
- Folding countertop
- Strong brackets
- Wall anchors
- Measuring tape
- Level
- Cutting board
- Optional stools
- Compact storage basket
How to use the idea
Start by identifying a wall with enough clearance for the table to fold down without blocking a doorway or walkway.
Measure the available width and depth. A narrow surface may be enough for food preparation, baking, or placing small appliances temporarily.
Choose hardware appropriate for the wall structure and intended load. If installation involves structural or electrical considerations, use qualified professional assistance.
When the table is folded up, it should occupy minimal visual space. When folded down, it becomes a temporary work surface.
For an especially cohesive appearance, select a finish that matches the countertop or cabinetry. Natural wood can add warmth to a neutral kitchen, while a white surface can visually disappear against the wall.
The area underneath the folded table can sometimes accommodate hooks or a slim storage rail, provided it does not interfere with the table’s operation.
If you need occasional seating, a pair of folding stools can turn the surface into a compact breakfast area. Store the stools vertically or in a nearby closet when not in use.
The biggest advantage is multifunctionality. One wall feature can function as a preparation surface, breakfast table, baking station, work area, or temporary serving counter.
This makes it particularly valuable in a small kitchen where every permanent piece of furniture has a significant impact on movement.
Keep the surface relatively uncluttered so that it is ready to use. Decorative objects can be placed nearby rather than permanently occupying the fold-down surface.
A fold-down table is an excellent example of modern small-space design because it responds to the changing needs of the room. Instead of demanding more square footage, it allows the existing space to perform multiple functions throughout the day.
18. Create a Compact Pantry With Matching Containers
A small pantry does not need to be a dedicated room. Even one cabinet, narrow shelf, or section of a kitchen wall can become a highly functional pantry when the contents are categorized and stored vertically.
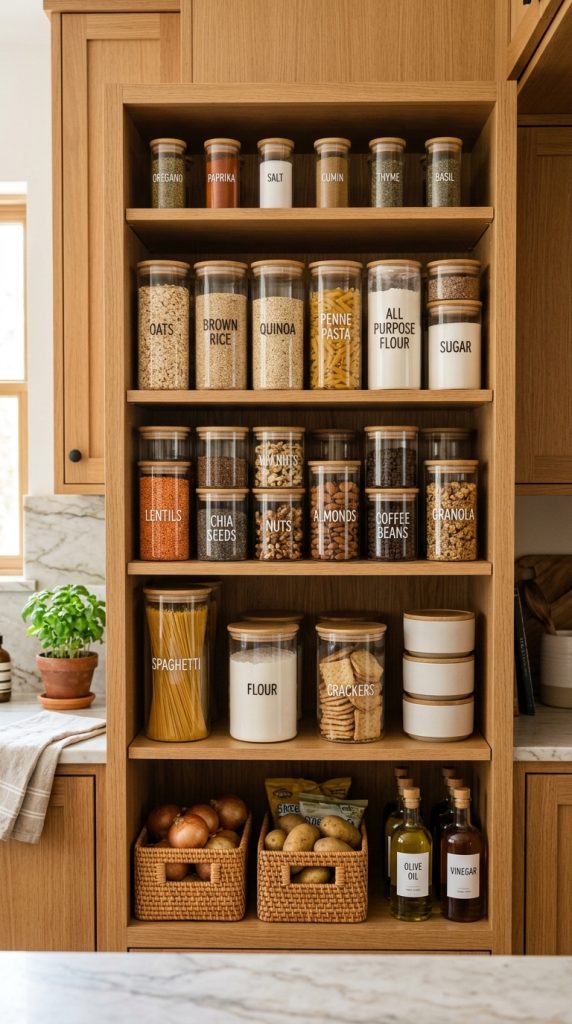
Matching containers are particularly helpful because they create visual order. They also make it easier to see how much of an ingredient remains, although food should always be stored according to appropriate food-safety recommendations.
Pantry materials
- Airtight food containers where appropriate
- Stackable bins
- Labels
- Shelf risers
- Narrow baskets
- Can organizers
- Lazy Susan
- Measuring scoop
- Small jars
- Inventory list
Step-by-step pantry setup
Begin by removing everything and checking expiration dates. Group ingredients by category rather than randomly returning them to the cabinet.
Possible categories include grains, pasta, baking ingredients, snacks, breakfast foods, canned goods, sauces, and cooking essentials.
Use stackable containers where they genuinely improve space efficiency. Tall containers can make better use of vertical height.
Place heavier items lower and frequently used ingredients at comfortable eye level.
Use small baskets for loose packets and snack items. A basket prevents small packages from spreading across an entire shelf.
A lazy Susan can be useful for bottles or jars that would otherwise hide behind one another.
Labels should be simple and consistent. Use the same style across the pantry rather than creating a collection of different fonts and colors.
Do not transfer foods into containers merely for aesthetic reasons if doing so makes expiration information, allergens, or preparation instructions harder to identify. Keep original packaging or relevant information accessible as needed.
The modern appearance comes from repetition: similar containers, coordinated labels, and clear categories.
A compact pantry also reduces food waste because ingredients are easier to see. When you know what you already have, you are less likely to purchase duplicates.
For Pinterest-inspired styling, place the most attractive containers and baskets in visible sections while keeping less visually appealing backup supplies in closed storage.
The pantry should ultimately support your daily routine. If an organizational system looks beautiful but takes too much effort to maintain, simplify it.
The best small-kitchen pantry is one that remains organized after several weeks of real cooking.
19. Use a Narrow Utility Cart as Flexible Kitchen Storage
A narrow rolling cart can provide storage without requiring permanent installation. Because it can move, the cart can serve different purposes depending on what the kitchen needs.
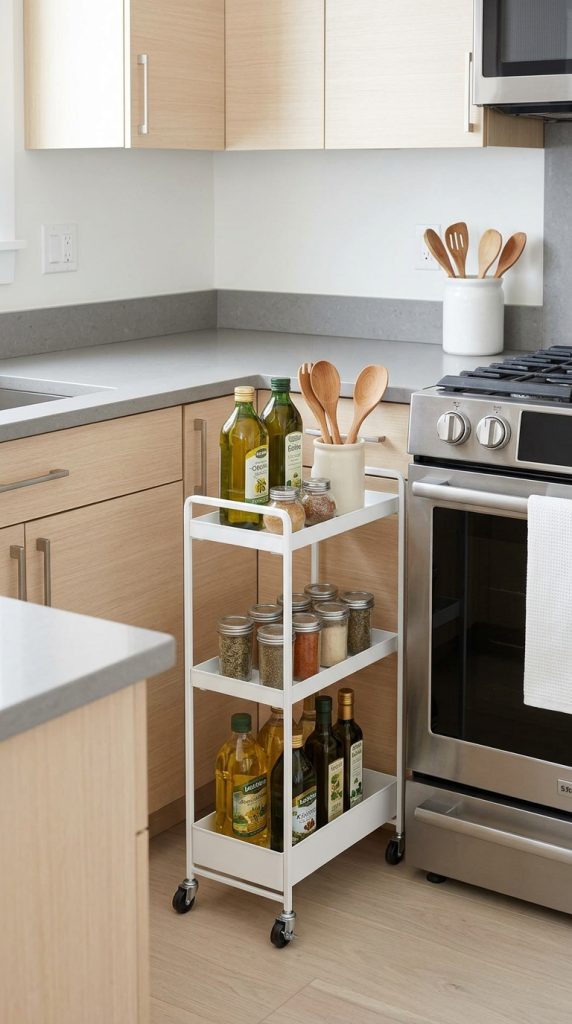
It can become a coffee cart, baking station, vegetable storage unit, beverage station, pantry overflow area, or appliance cart.
Useful items
- Slim rolling cart
- Storage baskets
- Small jars
- Hooks
- Canisters
- Wooden tray
- Kitchen towels
- Small plants
- Appliance
- Labels
- Non-slip liner
How to style and organize it
Choose a cart that is narrow enough to fit comfortably into your kitchen. Measure the space before buying.
Decide on one primary purpose. A cart that stores everything eventually becomes cluttered.
For a coffee cart, place the coffee machine or coffee supplies on the top level, mugs on the middle shelf, and backup supplies below.
For a baking cart, store mixing bowls, baking trays, flour containers, measuring tools, and accessories together.
Use baskets to hide small miscellaneous items.
Keep the top surface attractive but functional. A wooden tray can group items together and prevent the cart from appearing scattered.
Wheels make the cart flexible, but that does not mean it should constantly move. Ideally, it should have a dedicated parking location.
If the kitchen is very small, choose a cart that can slide beneath a counter or fit beside a refrigerator when not needed.
The cart can also be useful during entertaining. Move it near a dining area and use it as a temporary serving station.
This makes it an excellent example of multifunctional furniture. Instead of buying separate storage pieces for different purposes, one compact unit can adapt to changing needs.
For a modern look, choose clean lines and a restrained material palette. Black metal with wood shelves works well in contemporary spaces. White metal can blend into a light kitchen, while natural wood creates a warmer appearance.
A narrow cart is also a budget-friendly option because it can be added without modifying cabinets or walls.
The key is disciplined organization. Give each shelf a clear role and avoid allowing unrelated items to accumulate.
When used intentionally, a rolling cart can increase storage, improve flexibility, and add personality to a small kitchen without making the room feel permanently crowded.
20. Combine Modern Decor With Hidden Multifunctional Storage
The most effective small-kitchen design does not treat decoration and organization as separate tasks. Instead, the two should work together. The final idea is to create a kitchen where decorative elements also provide storage or practical function.

A wooden cutting board can lean against the backsplash while remaining ready for food preparation. Attractive ceramic containers can store everyday ingredients. A bench can provide seating and hidden storage. A decorative tray can organize cooking oils. A floating shelf can display dishes while holding frequently used kitchenware.
This approach is particularly valuable when square footage is limited because every object earns its place.
Materials and things to incorporate
- Decorative storage baskets
- Wooden cutting boards
- Ceramic canisters
- Glass jars
- Floating shelves
- Storage bench
- Decorative tray
- Multifunctional stools
- Wall hooks
- Small plants
- Neutral textiles
- Coordinated containers
Step-by-step design strategy
Begin by identifying the objects you already use every day. Instead of hiding everything, decide which items are attractive enough to become part of the kitchen’s visual design.
Group similar materials together. Natural wood, ceramic, woven baskets, glass, and matte metal can create a sophisticated modern combination.
Choose one primary color palette. Warm white, beige, light wood, muted green, soft gray, and black accents can work together without overwhelming a small room.
Then identify opportunities for dual-purpose decor.
A beautiful basket can store kitchen towels. A ceramic crock can hold cooking utensils. A narrow shelf can display cookbooks and store spices. A stool can provide seating while fitting beneath a counter.
Use vertical space wherever possible, but keep the walls from becoming overloaded.
Maintain open countertop areas. Even if storage is available, the kitchen needs breathing room to feel spacious.
Use lighting to highlight useful areas. Under-cabinet lighting can make a preparation zone more functional while creating a warm atmosphere.
The final step is editing. Walk through the kitchen and remove anything that feels unnecessary, duplicated, or visually distracting.
Modern design is often less about adding and more about selecting.
The result should feel effortless: useful items are easy to find, decorative objects have a purpose, and storage solutions blend into the overall design.
This philosophy can transform even the smallest kitchen because it eliminates the artificial division between “pretty” and “practical.” Instead, the entire room becomes a coordinated system.
A kitchen does not need expensive renovations to feel luxurious. Clean surfaces, thoughtful organization, warm materials, good lighting, and multifunctional storage can create the same sense of intentionality.
Final Takeaway: Build a Small Kitchen That Feels Bigger
The best modern kitchen decor ideas are not necessarily the most expensive ones. In a compact kitchen, smart planning often creates a greater impact than a large renovation. The goal is to make every available area work harder while keeping the overall room visually calm.
The ten ideas in Part 2 demonstrate several powerful small-space principles. Vertical cabinet extensions use otherwise ignored height. Slim storage towers transform corners into functional zones. Drawer dividers make existing storage easier to use. Appliance garages remove bulky equipment from sight. Backsplash systems convert walls into practical storage. Tiered cabinet organizers improve visibility. Fold-down tables add temporary workspace. Compact pantries make food storage more efficient. Rolling carts provide flexible organization, while multifunctional decor allows everyday objects to contribute to the room’s aesthetic.
The most important step is to begin with your actual problems.
If your counters are crowded, prioritize hidden appliance storage and multifunctional countertop organization. If your cabinets are full, look at vertical storage, tiered organizers, cabinet-door solutions, and narrow pantry systems. If your drawers are chaotic, use dividers before buying more storage furniture. If you lack workspace, consider a fold-down counter or multifunctional cart.
The best storage solution is the one that matches your routine.
Think about what you reach for every day. Think about what repeatedly becomes cluttered. Think about which items are difficult to access. Then design storage around those habits.
For a modern Pinterest-inspired appearance, repetition and restraint are essential. Choose a small group of complementary materials instead of using every trend at once. Natural wood can add warmth. Matte black can create contrast. Glass can keep storage visually light. Woven baskets can soften hard cabinetry. Ceramic containers can introduce handcrafted character. Neutral textiles can make the kitchen feel welcoming.
Color should also support the feeling of space. Light neutrals can help a compact kitchen appear brighter, while carefully selected darker accents create definition. You do not need to make everything white to create a spacious feeling. The more important factor is visual consistency.
Another important principle is open space. Storage should not become an excuse to fill every wall and surface. Modern kitchens look best when functional areas are balanced with empty areas. Leave part of the countertop clear. Avoid overcrowding floating shelves. Use only as many baskets and containers as necessary.
Organization should also be sustainable. A system that looks perfect for one day but becomes difficult to maintain is not a successful system. Make sure everyday objects are easy to return to their designated homes.
A beginner-friendly makeover can happen gradually. Start with one cabinet, one drawer, one corner, or one wall. Remove unnecessary items, measure the available space, select an appropriate storage solution, and then style the area with a few coordinated details.
The result should not simply be a kitchen that looks good in a photograph. It should be a kitchen that feels better every morning when you make breakfast, every evening when you prepare dinner, and every weekend when you clean and reset the space.
Small kitchens can be beautiful because limitations encourage creativity. A narrow wall becomes a storage system. An empty corner becomes a pantry. A cabinet door becomes an organizer. A bench becomes a hidden cupboard. A rolling cart becomes a flexible workstation. A simple shelf becomes both decor and storage.
That is the real secret behind modern small-kitchen design: do more with less while keeping the room visually simple.
When storage, decor, and daily function are designed together, even a compact kitchen can feel spacious, organized, warm, and genuinely enjoyable to use.
20-Idea Quick Reference
- Floating shelves can combine display and everyday storage.
- Cabinet sides can become narrow spice or utensil stations.
- Rolling pantry units can transform unused gaps.
- Coffee stations can organize beverage supplies beautifully.
- Cabinet-door organizers create hidden storage.
- Pegboards turn blank walls into flexible organization zones.
- Storage benches combine seating with concealed storage.
- Under-sink pull-outs make difficult cabinets easier to use.
- Magnetic systems move small tools onto unused wall space.
- Countertop stations group everyday essentials into one organized area.
- Vertical cabinet extensions make use of unused upper space.
- Slim storage towers turn awkward corners into useful zones.
- Drawer dividers give every small utensil a defined home.
- Appliance garages hide bulky countertop equipment.
- Backsplash storage adds function without using floor space.
- Tiered organizers make deep cabinets easier to see and access.
- Fold-down counters create workspace only when needed.
- Compact pantry systems maximize food-storage efficiency.
- Rolling carts provide flexible, multifunctional storage.
- Multifunctional decor allows useful objects to become part of the design.
The overall strategy is simple: declutter first, measure second, organize third, and decorate last. When storage is solved before decorative styling begins, the final kitchen is more likely to remain practical, attractive, and easy to maintain.
Leave a Reply