A small bathroom can be one of the most challenging rooms in the home to organize. There may be barely enough floor space for the essentials, yet you still need somewhere to keep towels, toiletries, skincare products, cleaning supplies, toilet paper, hair tools, and everyday bathroom necessities.
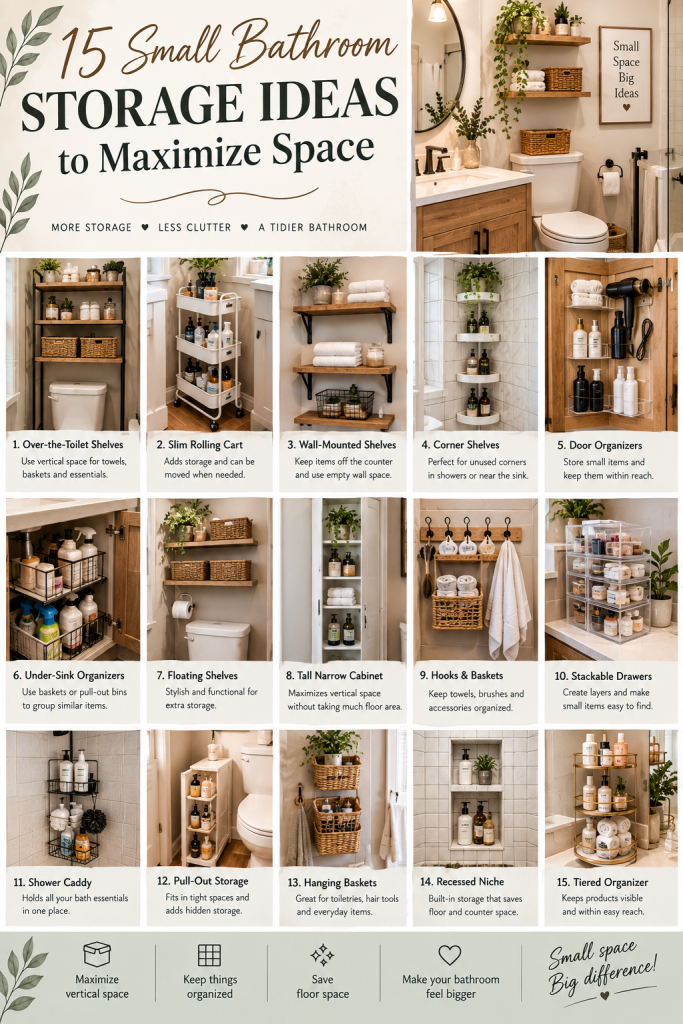
The good news is that a small bathroom does not have to feel cramped or permanently messy.
The secret is to stop thinking only about the floor.
When floor space is limited, the walls, doors, corners, cabinet interiors, and even the space above the toilet can become valuable storage areas. With the right combination of shelves, baskets, hooks, organizers, drawers, and clever vertical solutions, a tiny bathroom can hold much more than you might expect.
The best small bathroom storage ideas do more than simply add places to put things. They also make everyday routines easier.
Instead of digging through a crowded cabinet every morning, you can give frequently used products a designated home. Instead of allowing towels to pile on a chair or countertop, you can create an attractive hanging system. Instead of letting bottles take over the shower floor, you can move them onto a wall-mounted organizer.
Good organization also makes a small bathroom appear larger.
A clear countertop creates visual breathing room. Matching baskets reduce visual noise. Floating shelves keep the floor open. Vertical storage draws the eye upward instead of making the room feel wider and more crowded.
You also do not need a major renovation to make a difference.
Many of these ideas can be completed using affordable organizers, existing furniture, adhesive hooks, baskets, small shelves, and simple DIY solutions. If you are renting, several options can also be adapted without making permanent changes, provided the products and mounting methods are appropriate for your walls.
Whether your bathroom is a tiny apartment bathroom, a narrow guest bathroom, a compact powder room, or a small family bathroom, these ideas can help you make the most of every available inch.
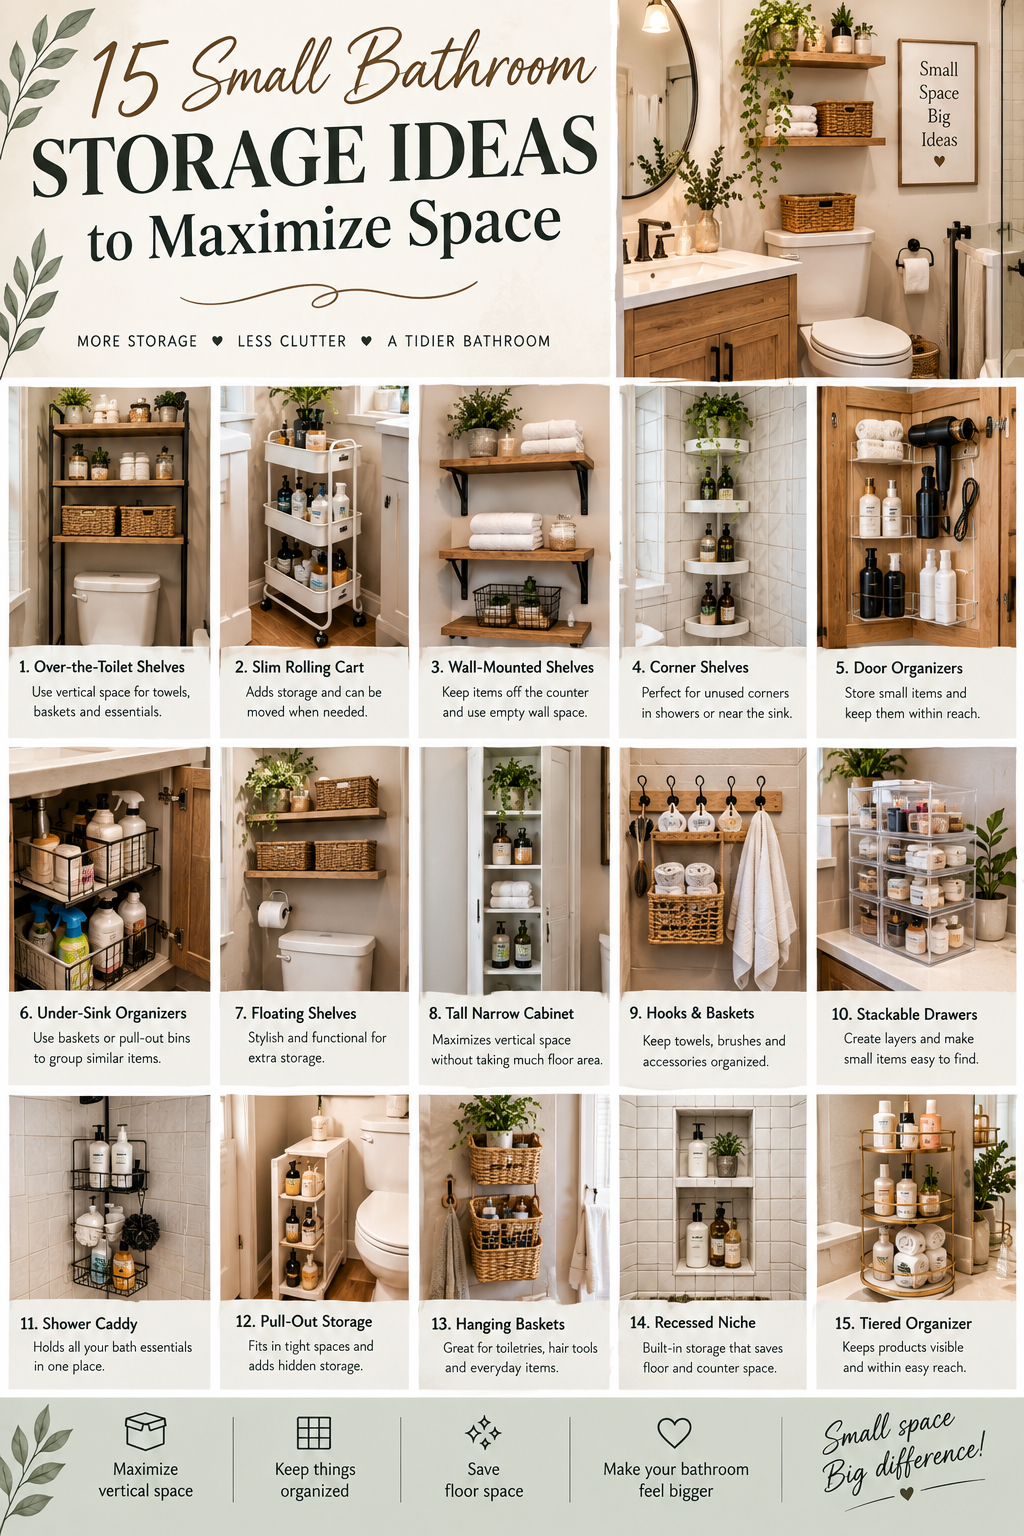
1. Install Floating Shelves Above the Toilet
The wall above the toilet is often one of the most underused areas in a small bathroom.
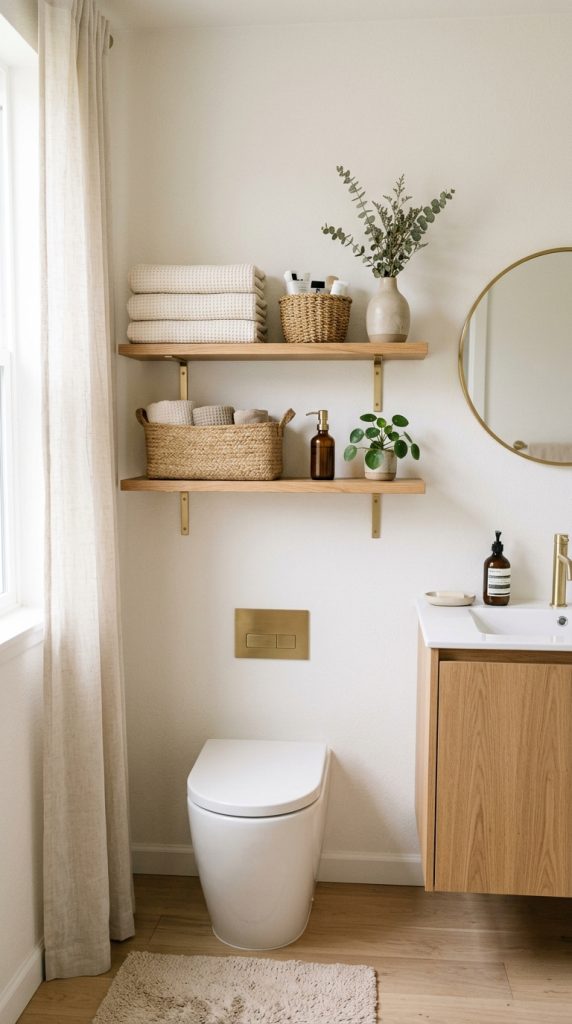
Because this space is usually empty, adding floating shelves can instantly create useful storage without taking up valuable floor space.
This is especially helpful when your bathroom does not have a large vanity or built-in storage cabinet.
A simple arrangement of two or three floating shelves can hold a surprising number of essentials.
Use the shelves for items such as:
- Rolled hand towels
- Extra toilet paper
- Small baskets
- Decorative containers
- Skincare products
- Spare soap
- Small plants
- Candles
- Bathroom accessories
The key is to avoid turning the shelves into another clutter zone.
Instead of placing every bathroom product directly on the shelf, use attractive baskets or containers to group smaller items.
For example, one woven basket can hold extra toilet paper while another can contain spare hand towels.
This makes the storage look intentional.
Choose the Right Shelf Style
For a warm and natural bathroom, try light wood shelves with woven baskets.
For a modern bathroom, choose simple white or black floating shelves.
For a luxurious look, consider shelves with warm wood and subtle brass brackets.
If your bathroom is extremely small, choose shelves that are relatively shallow.
You do not need a very deep shelf for towels or toilet paper.
A shallow shelf keeps the wall storage useful without making the toilet area feel visually crowded.
Create a Balanced Arrangement
You can install three shelves directly above the toilet, or use two shelves and leave some open wall space between them.
Another option is to place a small shelf above the toilet and a second one slightly higher.
Keep heavier items on the lower shelf and lighter decorative pieces toward the top.
Make It Pinterest-Worthy
Use a limited color palette.
For example:
White towels + natural wood + beige baskets + small greenery.
This creates a clean and sophisticated appearance.
Instead of filling the shelves with brightly colored product packaging, transfer frequently used items into neutral containers where practical.
The result is both functional and attractive.
2. Use a Slim Rolling Cart Between the Toilet and Vanity
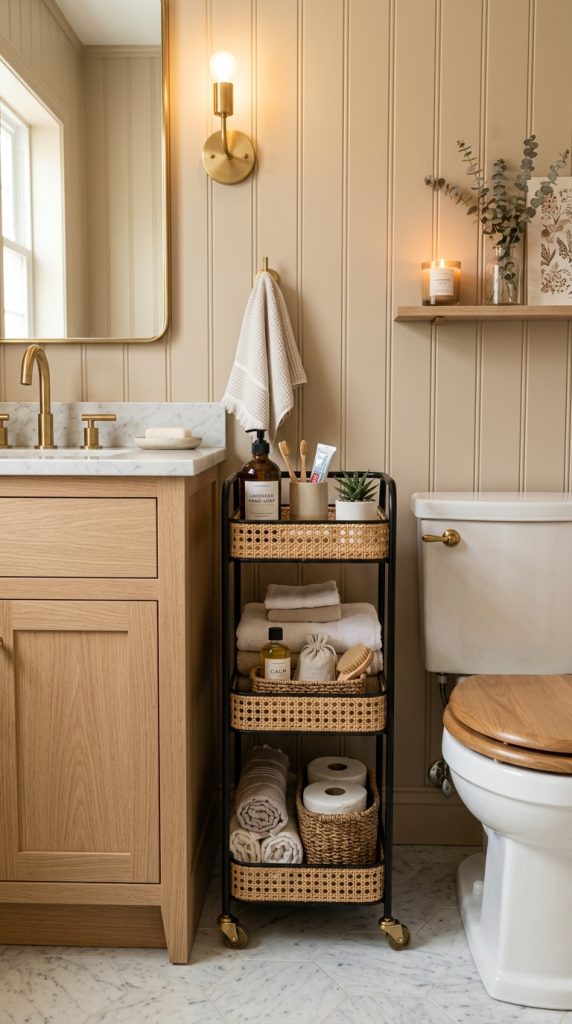
One of the smartest solutions for an extremely small bathroom is a narrow rolling storage cart.
The advantage is that it can fit into awkward spaces that traditional cabinets cannot use.
Look for a slim cart that is narrow enough to fit between the toilet and vanity, beside the bathtub, or in another unused gap.
The cart can provide several levels of storage.
Use the different shelves for different categories.
For example:
Top shelf: Everyday skincare and toiletries
Middle shelf: Haircare and beauty supplies
Bottom shelf: Toilet paper, cleaning supplies, or extra towels
Because the cart has wheels, you can move it when cleaning or when you need access to the plumbing.
Why Rolling Carts Work So Well
A small gap may not seem useful.
But when you multiply a few inches across three or four shelves, you can gain a surprising amount of storage.
This is especially useful in rental apartments where you cannot install permanent cabinetry.
Keep It Organized
Do not simply throw everything onto the shelves.
Use small containers inside the cart.
One container can hold hair accessories.
Another can hold skincare products.
Another can hold extra soap.
This prevents the cart from becoming messy.
Choose a Stylish Cart
Instead of choosing purely based on utility, consider the bathroom’s design.
A white metal cart works well in a bright minimalist bathroom.
A black cart looks attractive in a modern or industrial bathroom.
A wood-and-metal cart can add warmth to a neutral bathroom.
If the cart remains visible, treat it like part of the decor.
3. Add an Over-the-Door Organizer
The back of the bathroom door is valuable real estate.
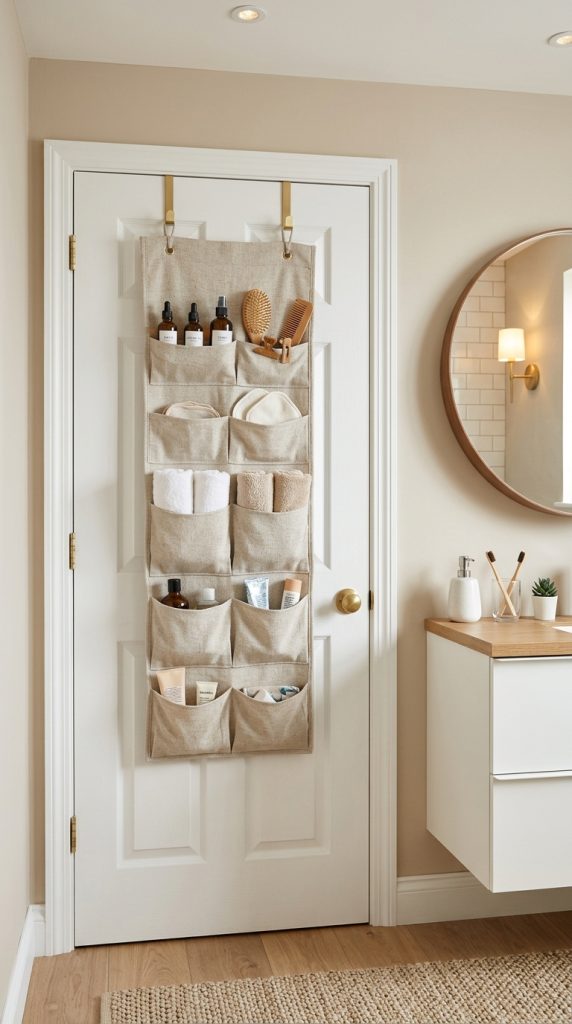
Most people see the door as an entrance and exit but forget that the back surface can provide significant storage.
An over-the-door organizer can create multiple pockets for small bathroom necessities.
Use it for:
- Hairbrushes
- Hair ties
- Skincare
- Makeup
- Travel-size toiletries
- Cleaning products
- Extra toilet paper
- Small towels
- Personal-care accessories
This is particularly useful if your vanity drawers are already full.
Why Door Storage Is Ideal for Small Bathrooms
It uses vertical space without taking away floor space.
It also keeps many small items hidden from the main view when the door is closed.
If you have a bathroom shared by several people, assign different pockets or sections to different categories.
This can make mornings much easier.
For a More Attractive Look
Choose an organizer with neutral fabric, clear pockets, or a simple structured design.
If the organizer will be visible frequently, avoid one with too many bright colors or visual patterns.
A neutral organizer will blend into the bathroom.
Important Consideration
Make sure the organizer is compatible with your door and does not interfere with closing.
Also check that the weight of stored items is appropriate for the organizer and door hardware.
4. Turn the Side of the Vanity Into Vertical Storage
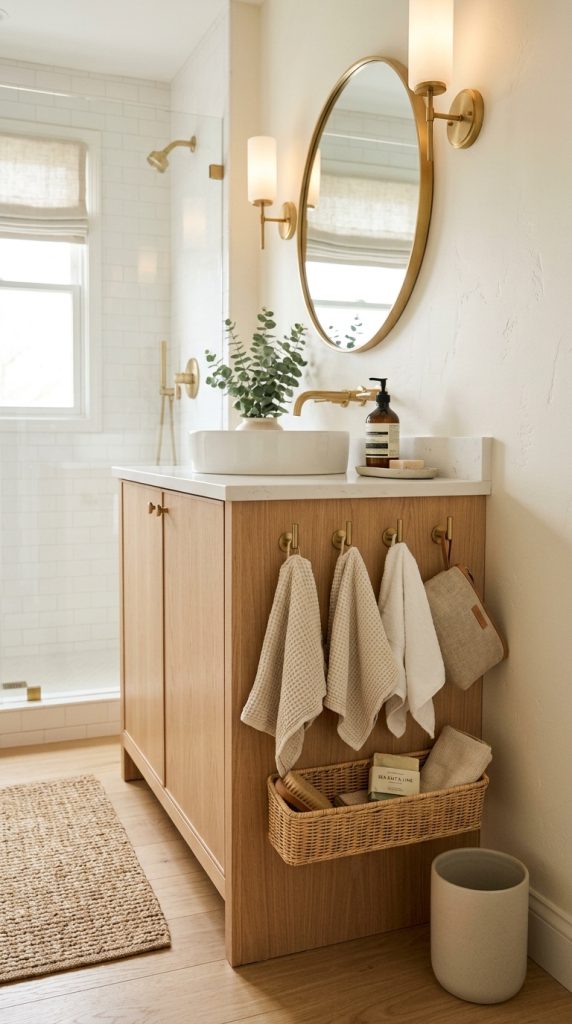
The side of a bathroom vanity is often completely unused.
If your vanity has an exposed side, you can use that surface for narrow storage.
Install slim hooks, rails, or small baskets designed for appropriate wall mounting.
This area can hold:
- Hand towels
- Washcloths
- Hair tools
- Small baskets
- Cleaning brushes
- Toiletry bags
If you have a very narrow bathroom, even two or three hooks can make a noticeable difference.
Use Hooks for Everyday Items
Hooks are particularly useful because they make items easy to grab.
Instead of folding a hand towel and stacking it somewhere, hang it directly on the side of the vanity.
You can also hang a small toiletry pouch.
Add a Narrow Basket
A slim basket attached appropriately to the vanity side can hold products that would otherwise sit on the countertop.
This is a great solution for renters if you can use a suitable removable mounting system.
Keep the Countertop Clear
The more storage you move vertically, the less you need to keep on the countertop.
This is one of the easiest ways to make a small bathroom look larger.
5. Install a Wall-Mounted Shower Organizer
The shower is one of the areas where clutter becomes particularly noticeable.
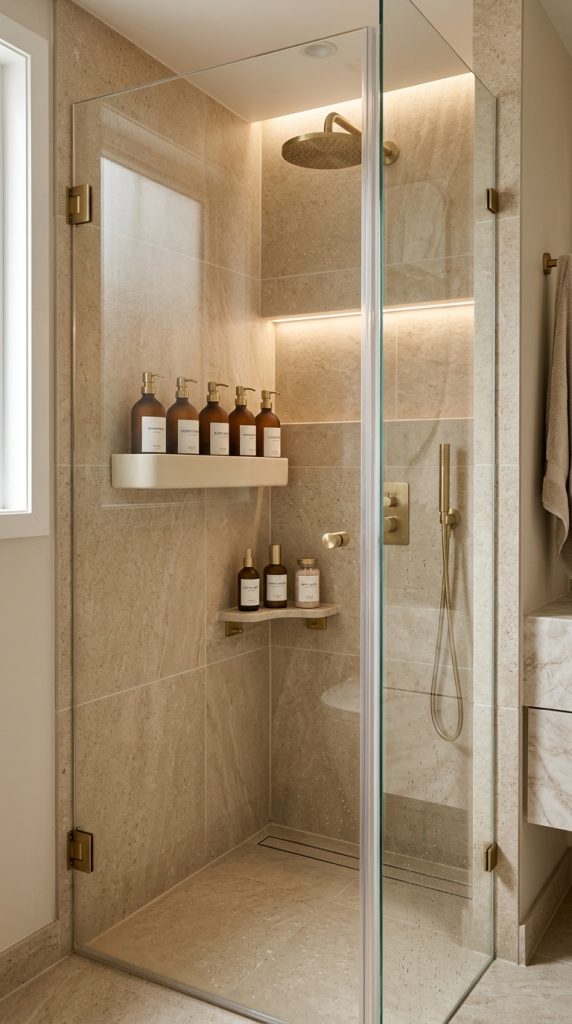
Shampoo, conditioner, body wash, facial cleanser, razors, sponges, and other products can quickly accumulate around the bathtub or shower floor.
A wall-mounted shower organizer can bring order to the space.
Choose an organizer with separate compartments.
Assign each section a purpose.
For example:
- Hair products
- Body products
- Facial products
- Shaving supplies
If several people share the bathroom, consider assigning different shelves to different users.
Make the Shower Look Cleaner
Instead of displaying multiple colorful bottles, you can use matching refillable containers if the products and container materials are compatible.
A consistent set of bottles creates a much calmer appearance.
Label them clearly so everyone knows what is inside.
Choose a Corner Organizer
If wall space is limited, a corner organizer can be particularly effective.
The corner is otherwise difficult to use.
A tiered corner shelf can create several levels of storage while maintaining the shower’s usable space.
Think About Drainage
Any shower organizer should allow water to drain properly.
Avoid designs that trap water around bottles.
Keeping storage dry and clean will make maintenance much easier.
6. Use the Space Under the Sink More Efficiently
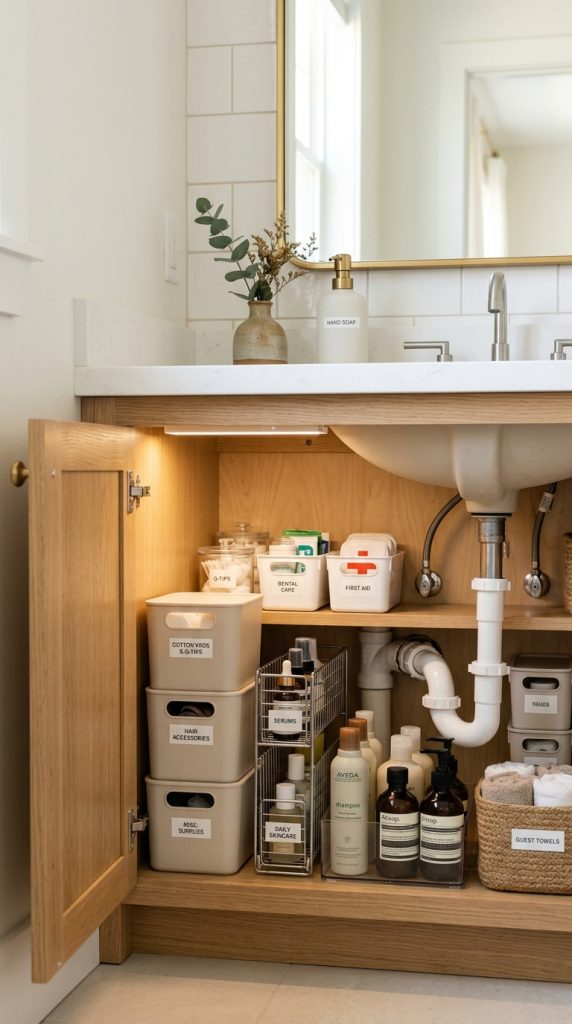
The cabinet beneath the sink is often one of the messiest storage areas in a small bathroom.
Plumbing pipes take up some of the space, while bottles and cleaning supplies get pushed toward the back.
Instead of treating the cabinet as one large storage box, divide it into zones.
Use:
- Stackable bins
- Pull-out baskets
- Small drawers
- Sliding organizers
- Adjustable shelves
- Narrow containers
The goal is to make everything accessible.
Create Categories
You might create one bin for cleaning supplies.
Another can hold extra soap.
Another can store personal-care products.
A separate container can hold backup toiletries.
This prevents products from becoming mixed together.
Use the Cabinet Door
The inside of the cabinet door can also become useful storage.
Depending on the cabinet and mounting system, you can add small organizers for:
- Sponges
- Brushes
- Gloves
- Small cleaning tools
- Hair accessories
This creates storage in an area that is normally ignored.
Avoid Overfilling
The temptation with under-sink storage is to fill every available space.
But if you cannot remove something easily, the organization is not working.
Leave enough space to access plumbing and clean the cabinet.
7. Add a Narrow Ladder Shelf for Towels
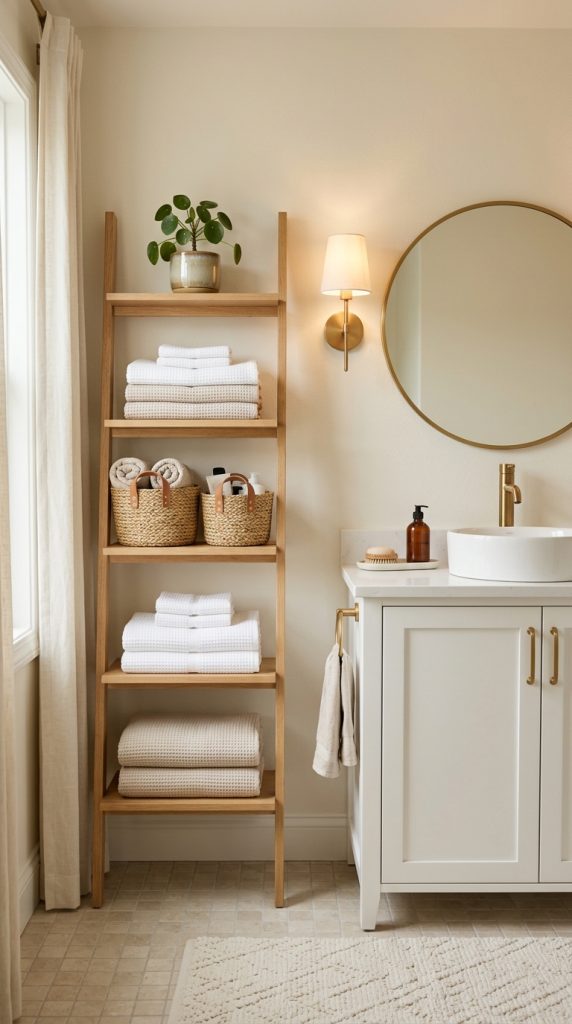
A ladder shelf is an attractive way to add vertical storage without requiring a large cabinet.
Its narrow footprint makes it especially useful in small bathrooms.
Lean a ladder-style shelf against an appropriate wall and use the different levels for towels and accessories.
The bottom levels can hold baskets.
The upper levels can hold folded towels or decorative items.
Style It Beautifully
Try:
- White towels
- Beige baskets
- Light wood
- Small greenery
- Neutral ceramic containers
This creates a spa-inspired appearance.
You can also use a dark wood ladder shelf for a warmer bathroom.
Keep the Floor Open
Because the ladder is narrow, it provides vertical storage while using relatively little floor area.
However, make sure it is stable and properly secured when necessary.
This is especially important in homes with children or where the shelf could be bumped.
Use It Near the Shower
A ladder shelf near the shower can hold clean towels.
Keep the lowest basket for less frequently used supplies.
The upper shelves can remain decorative.
8. Install Hooks Instead of Traditional Towel Bars
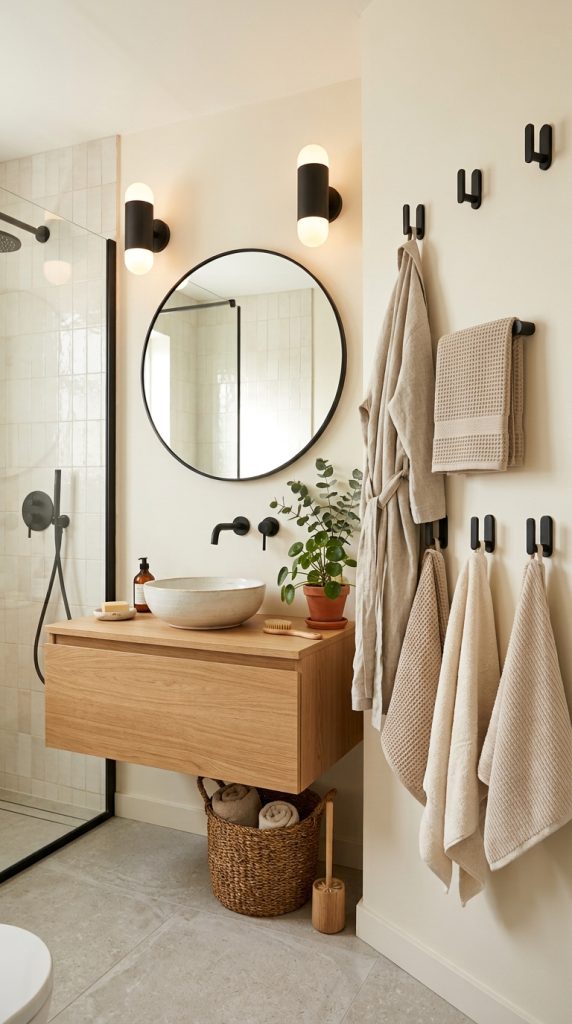
Traditional towel bars can take up more wall space than you realize.
Hooks are often more efficient in a small bathroom.
A single horizontal row of hooks can hold several towels while occupying relatively little width.
You can also place hooks behind the bathroom door.
Use Different Hooks for Different Purposes
Install one hook for each person’s bath towel.
Add smaller hooks for:
- Hand towels
- Washcloths
- Robes
- Hair towels
This prevents towels from being thrown over furniture or left on the floor.
Choose Attractive Hardware
Because hooks are visible, choose hardware that complements your bathroom.
For example:
Modern bathroom: matte black hooks
Traditional bathroom: brushed brass hooks
Farmhouse bathroom: wood or antique-style hooks
Minimalist bathroom: simple white hooks
Small hardware changes can make a surprisingly big difference.
Use Vertical Space
Instead of installing hooks in one long horizontal line, consider a vertical arrangement if wall width is limited.
Three hooks stacked vertically can fit into a narrow strip of wall.
This is especially useful beside a vanity or shower.
9. Create a Built-In Look With Recessed Wall Shelves

If you are renovating your bathroom, recessed shelving can be one of the most effective long-term storage solutions.
A recessed niche uses space inside the wall rather than projecting into the bathroom.
This is especially valuable in small showers.
A recessed shower niche can store:
- Shampoo
- Conditioner
- Body wash
- Soap
- Razors
- Skincare products
Because the shelves are built into the wall, they do not reduce walking or showering space.
Think About Placement
Place the niche where it is comfortable to reach.
For a shower, consider the height of the people using it.
For a vanity wall, a recessed niche can display towels or decorative objects.
Make It a Design Feature
Storage does not have to look purely functional.
You can finish the niche with attractive tile.
Try a contrasting material inside the niche to create a focal point.
For example:
- White bathroom + warm stone niche
- Beige bathroom + textured tile
- Marble-look bathroom + darker niche
- Neutral bathroom + handmade-look tile
Renovation Consideration
Because recessed niches involve modifying walls, they require proper planning.
Before cutting into a wall, confirm plumbing, electrical, structural, waterproofing, and local building requirements with an appropriate professional.
For a shower niche, correct waterproofing is particularly important.
10. Use a Mirrored Medicine Cabinet for Hidden Storage
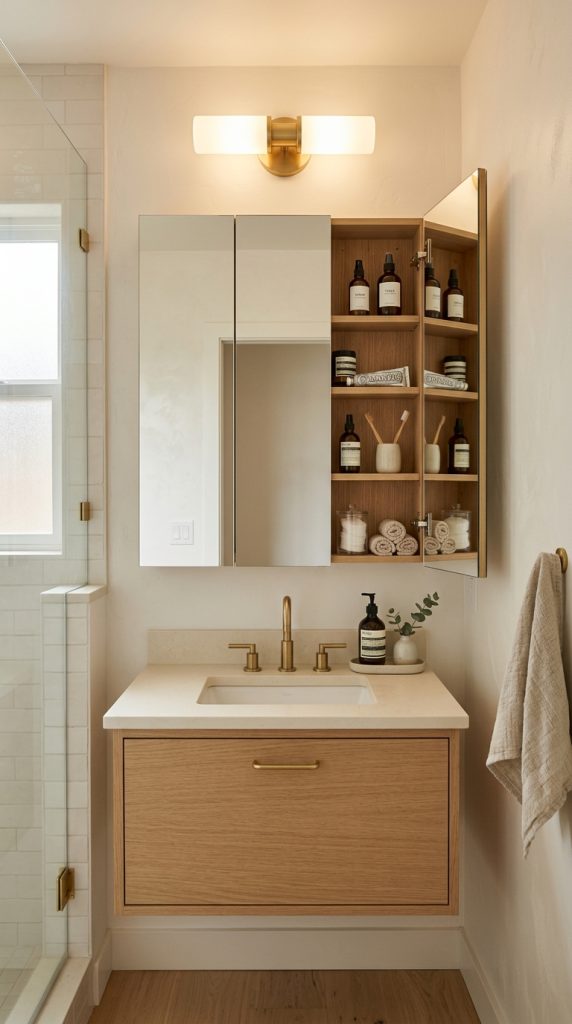
A mirror and storage cabinet can perform two jobs at once.
Instead of installing a simple mirror and then searching for another place to store medicines and toiletries, choose a mirrored medicine cabinet designed for bathroom use.
The mirror helps the bathroom feel open.
The cabinet provides hidden storage.
This combination is ideal for small bathrooms.
What to Store Inside
Use it for products you reach for regularly:
- Skincare
- Toothpaste
- Dental supplies
- Small grooming products
- Medicines where appropriate
- Contact-lens supplies
- Small beauty products
Keep medicines stored safely and according to their labels and local guidance.
Organize the Shelves
Use small clear containers or shelf risers.
Group similar items.
For example:
Daily skincare
Dental care
First-aid supplies
Small grooming items
This prevents the medicine cabinet from becoming another chaotic storage space.
Keep the Countertop Minimal
Once everyday items have a home inside the mirrored cabinet, you can remove much of the visual clutter from the sink area.
This makes the bathroom feel instantly more spacious.
11. Use Attractive Baskets to Hide Bathroom Clutter
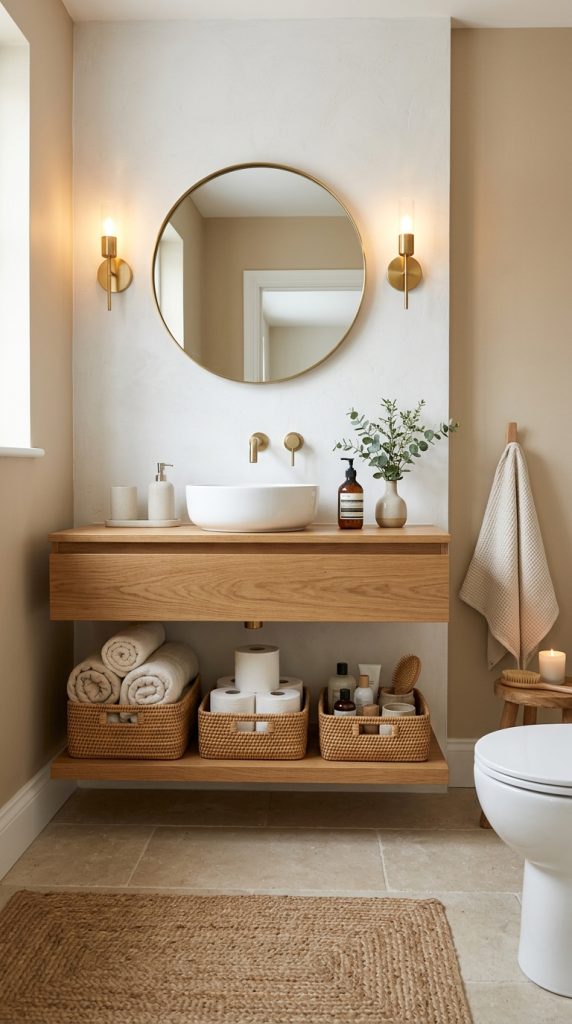
Baskets are one of the simplest ways to organize a small bathroom while improving its appearance.
They are especially useful for items that are necessary but visually unattractive.
Use baskets for:
- Extra toilet paper
- Towels
- Hair products
- Cleaning supplies
- Extra toiletries
- Guest supplies
Choose Baskets That Fit Your Style
For a warm bathroom, try woven baskets.
For a minimalist bathroom, choose simple fabric or wire baskets.
For a modern bathroom, use structured baskets in neutral colors.
Label Them
If several baskets look similar, labels can make everything easier to find.
For example:
Towels
Toiletries
Cleaning
Extra Supplies
Labels are particularly helpful in family bathrooms.
Use Baskets on Shelves
Instead of placing ten individual items on an open shelf, place them inside one basket.
This reduces visual noise.
It also makes cleaning easier.
You can remove the basket, wipe the shelf, and put it back.
Avoid Oversized Baskets
A large basket may look attractive but can waste valuable space.
Choose a size that matches the storage area.
In a small bathroom, several smaller baskets can sometimes be more useful than one giant basket.
12. Add a Slim Cabinet Between the Toilet and Wall
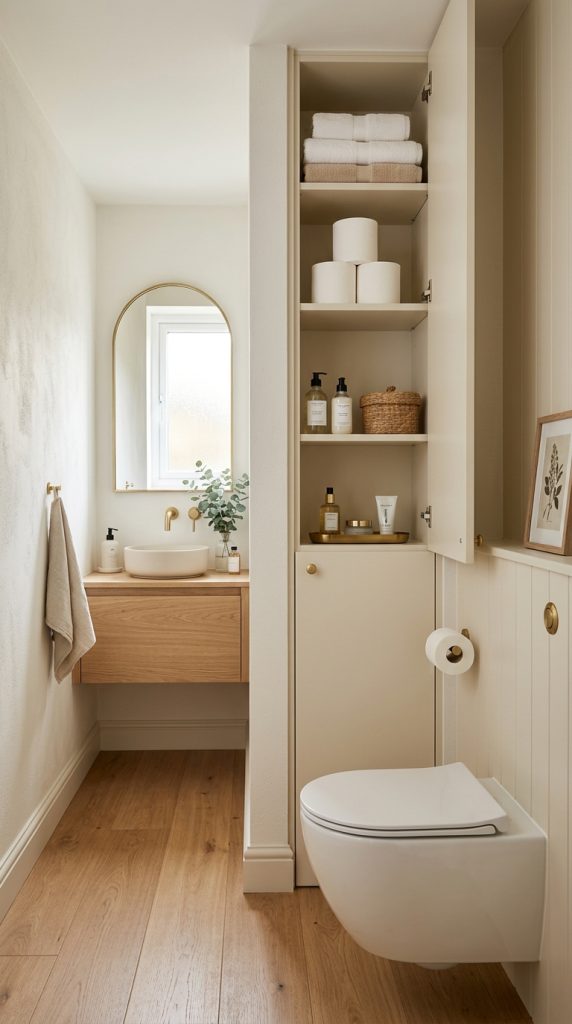
If you have a narrow gap between the toilet and another wall or piece of furniture, consider using a slim freestanding cabinet.
This is particularly useful when the space is too narrow for conventional furniture.
A tall, narrow cabinet can provide several shelves.
Use it for:
- Toilet paper
- Towels
- Toiletries
- Cleaning products
- Extra soap
- Guest supplies
Choose a Vertical Design
The taller the cabinet, the more storage you can gain without consuming much floor width.
But make sure the cabinet does not make the bathroom difficult to navigate.
Measure carefully before purchasing.
Use Doors to Hide Clutter
A closed cabinet can be particularly useful in a small bathroom because it visually hides products.
Choose a cabinet with a simple front.
White cabinetry can blend into a light bathroom.
Natural wood can create warmth.
Dark cabinetry can add contrast.
Make It Feel Built In
If the cabinet matches the bathroom’s colors and finishes, it can appear more intentional.
Place a small decorative object on top if there is enough clearance.
Avoid turning the top into another storage pile.
13. Turn an Empty Corner Into a Storage Station
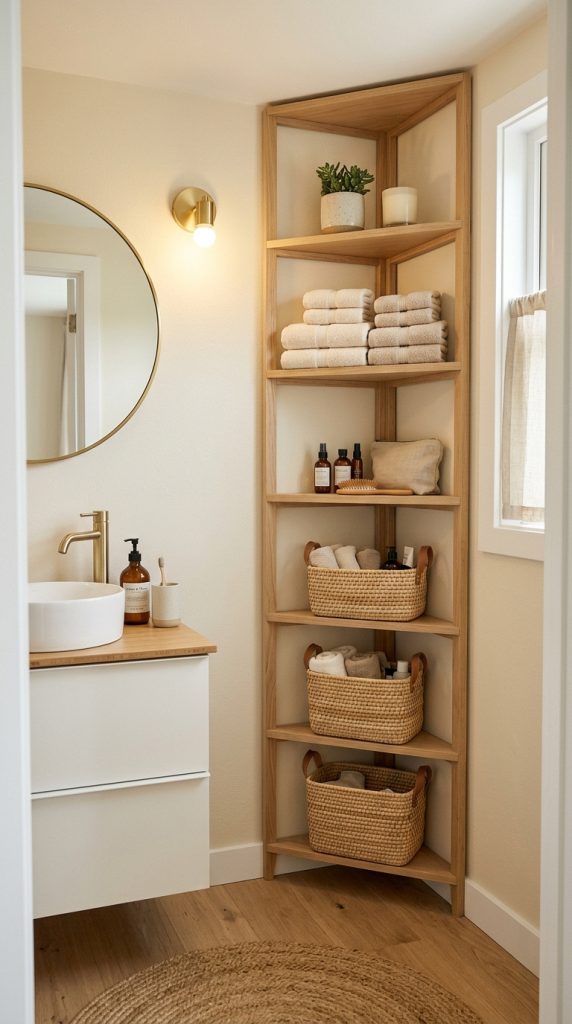
Corners are often difficult to use, but they can become excellent storage areas with the right furniture.
A corner shelf or triangular shelving unit can transform an empty corner into useful storage.
This is especially effective in bathrooms with:
- Empty corners beside the vanity
- Space beside the bathtub
- Wide corners near the door
- Unused areas beside a shower
Create a Vertical Corner
A tall corner shelf can hold several levels of storage.
Place frequently used items at eye level.
Use lower shelves for baskets.
Use the highest shelf for decorative pieces or backup supplies.
Style With Purpose
For example:
Top: Small plant or decorative vase
Middle: Rolled towels
Lower: Basket of toiletries
Bottom: Extra toilet paper
This combines storage with decor.
Use a Corner Shower Shelf
If the corner is inside the shower, choose a waterproof organizer specifically designed for wet areas.
This keeps bottles off the floor.
Why Corners Matter
Small bathrooms often have very little open wall space.
Corners give you an opportunity to add storage without taking over the main walls.
14. Create a Hidden Hair-Tool Storage Station
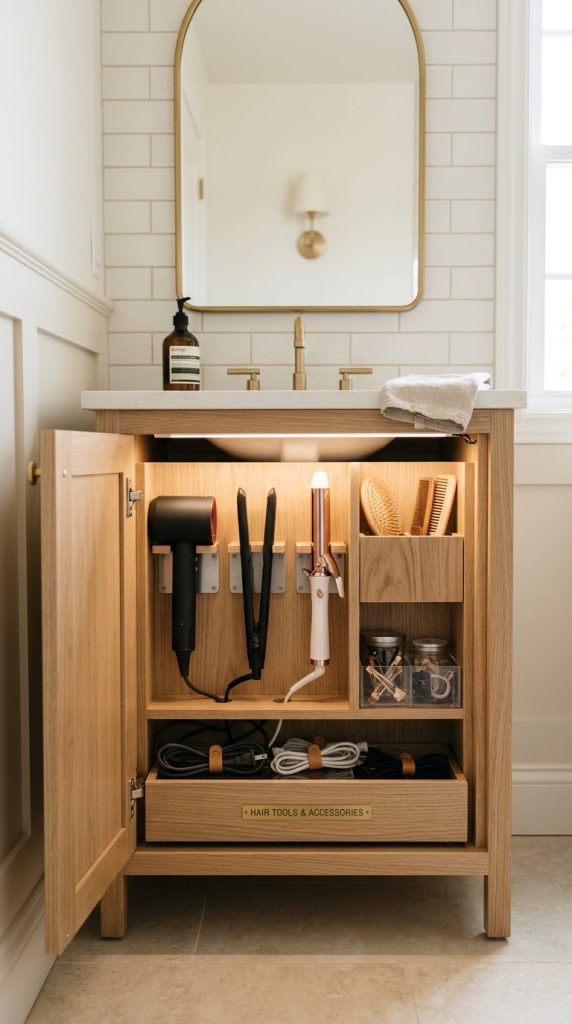
Hair dryers, curling irons, straighteners, brushes, and styling products can create significant clutter.
Instead of keeping them on the countertop, create a dedicated hair-tool station.
One solution is to use a suitable heat-resistant organizer designed for bathroom hair tools.
Another option is a cabinet organizer that keeps cords contained and tools separated.
Organize by Frequency
Keep everyday tools at the easiest-to-reach level.
Store occasional-use tools higher or farther back.
Use cord-management solutions designed for the equipment.
Do not store hot styling tools in a way that creates a fire or heat hazard. Follow the manufacturer’s instructions and allow heated devices to cool completely before storing them.
Use the Cabinet Door
The inside of a vanity cabinet door can be useful for small hair accessories.
You can store:
- Hair ties
- Clips
- Brushes
- Combs
- Small styling products
Keep the Countertop Clear
A bathroom countertop covered with hair tools immediately makes a small room feel smaller.
Moving them into one organized station creates a much cleaner appearance.
15. Build a Multi-Purpose Storage Wall

If you want the biggest possible transformation, combine several storage ideas into one organized wall.
A storage wall does not necessarily require a full renovation.
You can create the effect with:
- Floating shelves
- Hooks
- Baskets
- Narrow cabinets
- A mirrored cabinet
- Small wall organizers
The idea is to assign every section of the wall a purpose.
For example:
Upper area: Decorative shelf
Middle area: Everyday toiletries
Lower area: Towels and baskets
Side area: Hooks
This creates a complete vertical storage system.
Keep the Design Cohesive
Use similar finishes throughout.
For example:
Light wood + white + beige + brushed brass
or
Black + white + warm wood
or
Cream + natural wood + woven baskets
A consistent palette makes several different storage products appear like one coordinated system.
Leave Breathing Room
Do not cover the entire wall with objects.
Leave some empty space between shelves and storage pieces.
The goal is to maximize storage without creating visual overload.
This is especially important in a small bathroom.
How to Maximize Every Inch of a Tiny Bathroom
The biggest mistake people make when organizing a small bathroom is focusing only on obvious storage.
Instead, look at every surface.
Ask yourself:
Can this wall hold a shelf?
Can the back of this door hold an organizer?
Can this cabinet door hold hooks?
Can this corner hold a narrow shelf?
Can the gap beside the vanity hold a rolling cart?
Can the space above the toilet be used?
Can a mirror also provide hidden storage?
Once you start looking vertically, a small bathroom suddenly offers many more possibilities.
Keep the Countertop as Clear as Possible
A crowded countertop makes a bathroom look smaller.
Try to keep only the things you use every day.
For example:
- Soap dispenser
- Toothbrush holder
- One small decorative item
Everything else can go into drawers, cabinets, baskets, or shelves.
This creates visual breathing room.
If you have many skincare products, consider keeping only your daily routine on the counter.
Store backup products elsewhere.
Use Matching Containers for a Cleaner Look
Bathroom products often come in packaging with many different colors and labels.
This can make even a well-organized shelf look messy.
Matching containers can create a more cohesive appearance.
You might use neutral containers for:
- Cotton pads
- Cotton swabs
- Bath salts
- Small accessories
- Hair ties
Transparent containers are also useful because you can see what is inside.
However, always label containers clearly when the contents could be confused with another product.
Declutter Before Buying Storage
One of the most important steps is also the cheapest.
Declutter first.
Remove products that are:
- Empty
- Expired
- Duplicates
- No longer used
- Damaged
- Unnecessary
You may discover that you need much less storage than you thought.
Do not buy an organizer simply because it looks attractive.
First decide what you actually need to store.
Then choose the storage solution based on those items.
Store Items According to Frequency of Use
The easiest way to organize a bathroom is to place things according to how often you use them.
Everyday Items
Keep these at eye level or within easy reach.
Examples include:
- Toothpaste
- Face wash
- Moisturizer
- Soap
- Hairbrush
Weekly Items
These can go in drawers or baskets.
Examples include:
- Hair treatments
- Face masks
- Nail-care supplies
Backup Items
Store these higher or farther away.
Examples include:
- Extra shampoo
- Spare toilet paper
- Backup soap
- Extra cleaning products
This simple system prevents daily essentials from getting buried underneath rarely used items.
Use Vertical Storage Whenever Possible
In a small bathroom, vertical space is often more valuable than horizontal space.
A tall narrow shelf can hold several levels of supplies while occupying only a small amount of floor area.
Vertical storage can include:
- Ladder shelves
- Tall cabinets
- Floating shelves
- Wall hooks
- Door organizers
- Hanging baskets
Look upward before adding more furniture.
Make Small Bathrooms Feel Larger With Visual Simplicity
Organization is not only about capacity.
It is also about perception.
A bathroom can physically contain many items but still feel spacious if those items are visually organized.
Use:
- Light colors
- Matching containers
- Clear surfaces
- Simple shelves
- Consistent materials
- Hidden storage
- Open floor space
Avoid placing large decorative objects everywhere.
One small plant can add life.
One beautiful vase can add personality.
One attractive basket can provide texture.
You do not need dozens of accessories.
Choose Storage That Matches Your Bathroom Style
Storage should look like it belongs in the room.
Modern Small Bathroom
Use:
- Matte black
- White
- Glass
- Clean-lined shelves
- Minimal baskets
Warm Minimalist Bathroom
Use:
- Light oak
- Beige
- Cream
- Woven baskets
- Soft textiles
Farmhouse Bathroom
Use:
- Rustic wood
- Galvanized metal
- Woven baskets
- Neutral towels
Luxury Bathroom
Use:
- Marble-look surfaces
- Warm wood
- Brushed brass
- Glass containers
- Soft neutral textiles
When storage matches the room, practical organization becomes part of the decor.
Budget-Friendly Small Bathroom Organization
You do not need to remodel your bathroom to improve storage.
Start with inexpensive solutions.
Use Existing Jars
Clean glass jars can hold:
- Cotton balls
- Cotton swabs
- Hair accessories
Reuse Small Baskets
Move baskets from another room if they fit your bathroom.
Add Simple Hooks
A few strategically placed hooks can solve towel and robe storage problems.
Use a Tension Rod
A properly installed tension rod in an appropriate location can create hanging space for lightweight items.
Do not overload it.
Add Stackable Bins
Stackable containers allow you to use vertical space inside cabinets.
Repurpose a Small Tray
A decorative tray can group everyday countertop products.
Instead of five products scattered around the sink, place them together on one tray.
The result immediately looks more intentional.
How to Organize a Small Bathroom Vanity
Start by removing everything.
Clean the drawers and cabinet.
Then divide products into categories.
For example:
Dental care
Skincare
Haircare
Beauty
Cleaning
Backups
Place everyday products in the easiest-to-reach areas.
Use drawer dividers for small items.
Use bins for larger categories.
Do not leave large empty gaps inside drawers.
Use organizers that make use of the available height.
But avoid filling every inch.
You need enough space to remove items easily.
How to Organize a Tiny Guest Bathroom
Guest bathrooms should feel simple and welcoming.
You do not need to store every personal product in the open.
Keep a small basket with:
- Fresh hand towels
- Extra toilet paper
- Hand soap
- Travel-size toiletries
- Tissues
Place it somewhere easy for guests to find.
Keep the countertop mostly clear.
A small vase, candle, or plant can provide decoration without taking up too much space.
How to Organize a Small Family Bathroom
A family bathroom needs stronger systems because several people may use the same products.
Give everyone a designated space.
For example:
- One drawer per person
- One basket per person
- Different shelf sections
- Labeled containers
Children’s products should be stored safely and appropriately.
Keep potentially dangerous products and medications inaccessible to children.
The simpler the system, the more likely everyone is to maintain it.
How to Keep a Small Bathroom Organized Long-Term
Creating an organized bathroom is one thing.
Keeping it organized is another.
The best system is one that is easy to maintain.
Try a five-minute reset at the end of the day.
Put products back where they belong.
Hang towels.
Clear the countertop.
Return toilet paper and supplies to their storage area.
Once a week, quickly check for empty containers.
Once a month, remove products you no longer need.
This prevents clutter from building up.
Final Thoughts
A small bathroom does not have to mean small storage.
The key is to use space creatively and intentionally.
Instead of relying entirely on a traditional vanity, look at the walls, doors, corners, cabinet interiors, and unused areas above fixtures.
Floating shelves can transform the wall above the toilet.
A slim rolling cart can use an awkward gap.
An over-the-door organizer can turn an unused door into a storage station.
Hooks can replace bulky towel bars.
A mirrored medicine cabinet can combine two essential functions.
Baskets can hide everyday clutter.
A ladder shelf can turn a narrow wall into vertical storage.
A shower organizer can keep bottles off the floor.
And a thoughtfully designed storage wall can bring several solutions together into one cohesive system.
The most important principle is to organize vertically before adding more floor furniture.
When floor space is limited, every inch matters.
Think upward.
Think about hidden areas.
Think about the back of doors.
Think about the inside of cabinets.
Think about corners.
Most importantly, think about how you actually use the bathroom.
The best storage system is not necessarily the one with the most shelves.
It is the one that makes your daily routine easier.
Keep everyday products within reach.
Move backup supplies out of the way.
Group similar items together.
Use baskets and containers to control visual clutter.
Choose storage pieces that complement your bathroom’s style.
And leave enough open space for the room to breathe.
With a little creativity, even the smallest bathroom can become organized, functional, and beautiful.
Whether you are working with a tiny apartment bathroom or simply trying to make a compact guest bathroom more practical, these 15 small bathroom storage ideas can help you maximize every inch without sacrificing style.
A well-organized bathroom should not feel like a storage room.
It should feel calm, clean, and easy to use.
And sometimes, all it takes is one empty wall, one forgotten corner, or one narrow gap to create the extra storage your bathroom has been missing.